Mass Deployment for IDrive® 360
Deploy IDrive® 360 via Group Policy Objects (GPO)
Remotely install the IDrive® 360 application on multiple computers in a network from the Windows Domain Server, by using Microsoft Active Directory Group Policy. To achieve this, create a Group Policy Object, move the IDrive® 360 MSI package to a shared network folder, and publish the GPO to all the computers across the domain. Read the steps detailed below to know more.
- Steps to create a Group Policy Object (GPO) under active directory environment
- Steps to assign and install the IDrive® 360 application on domain computers
- Steps to register a set of computers under a particular group via GPO
- Steps to register a set of computers under a particular group with Private Key encryption method via GPO
- Steps to register a set of computers with a tag name
Prerequisites for remote MSI deployment:
- Sign in to your IDrive 360 account, choose the type of application you want to install - full suite or thin client, then download the MSI installer package. Alternatively, click the 'Copy Link' button to copy the installation link.
- Configuration ID copied from the 'Add Computers' section in the Backup Console
- Shared folder accessible via all the domain users
- Active directory environment
Steps to create a Group Policy Object (GPO) under active directory environment
- From the 'Start' menu, go to 'Administrative Tools' and open 'Group Policy Management'.

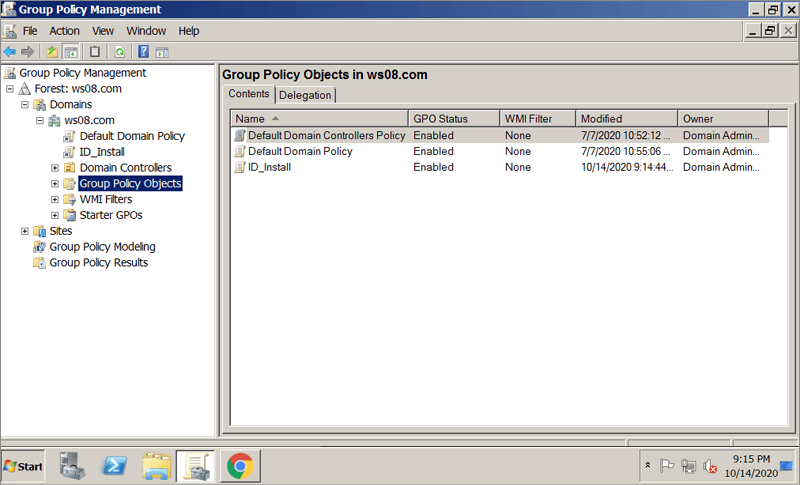
- In the 'Group Policy Management' console, navigate to 'Forest', the folder for creating group policy.
- Double-click 'Domains' and navigate to 'Group Policy Object'.
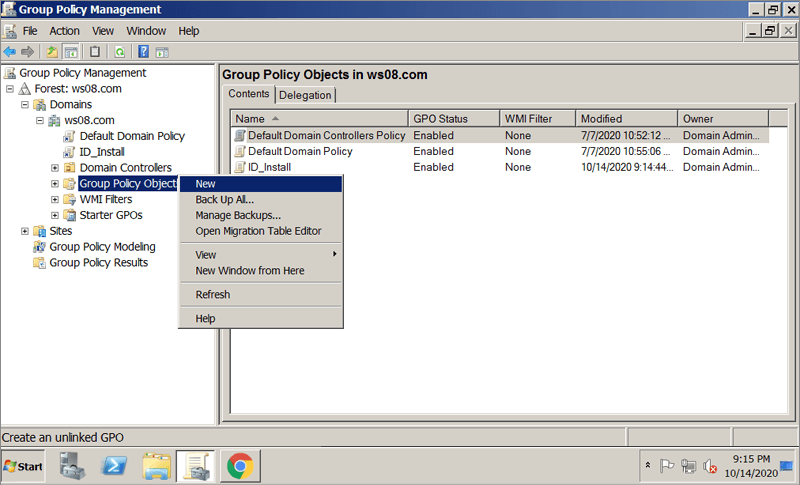
- Right-click 'Group Policy Object' and select 'New' from the drop-down menu.
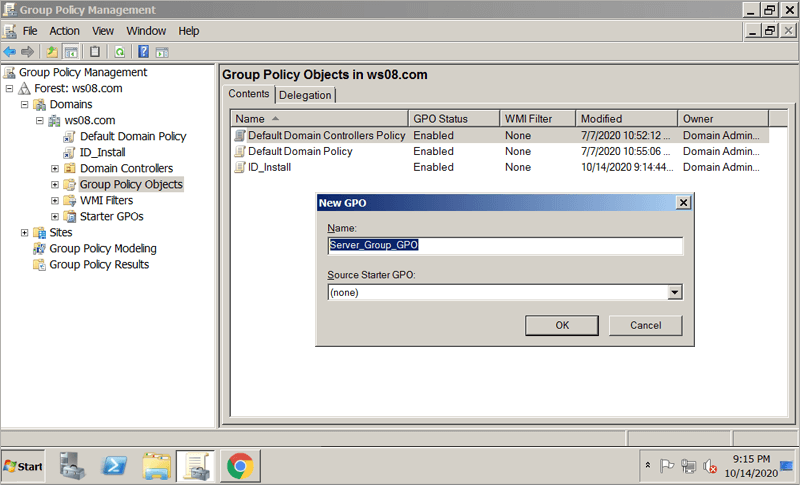
- Assign a name to the GPO group and click 'OK'.
Steps to assign and install the IDrive® 360 application on domain computers
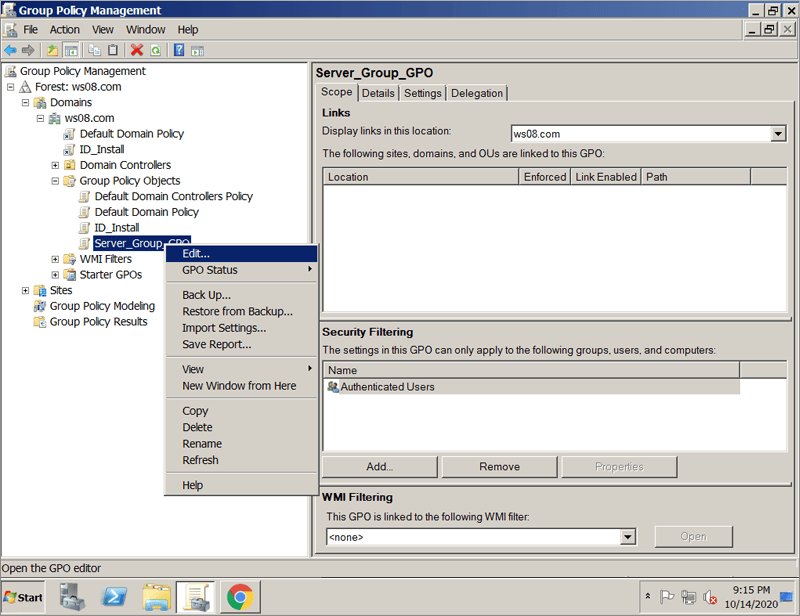
- Right-click the new group policy and select 'Edit' from the drop-down menu. This will launch the 'Group Policy Management Editor'.
- Navigate to 'Computer Configuration' > 'Policies' > 'Software Settings' > 'Software installation'.
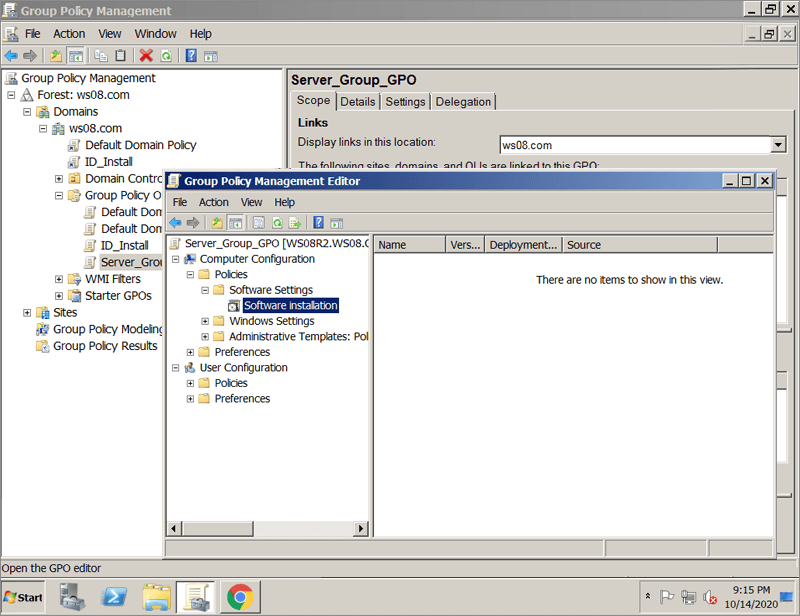
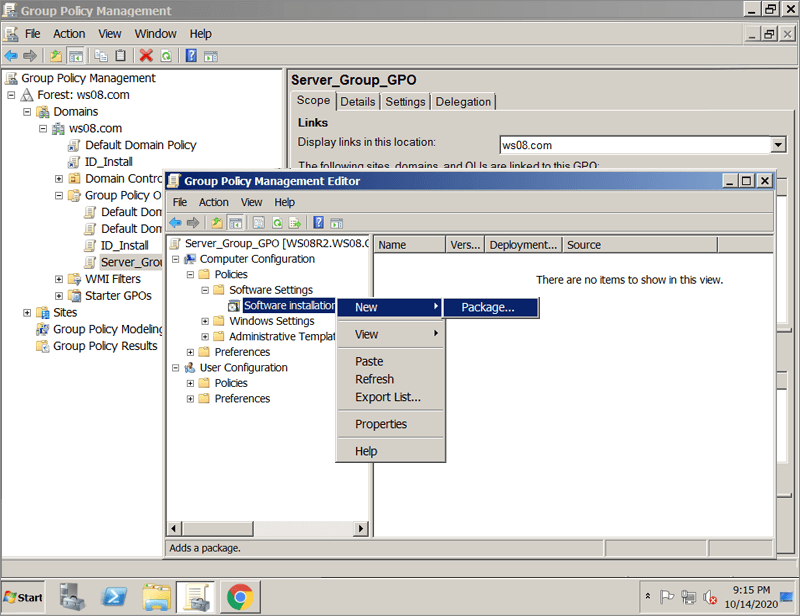
- Right-click 'Software installation' and navigate to 'New' > 'Package'.
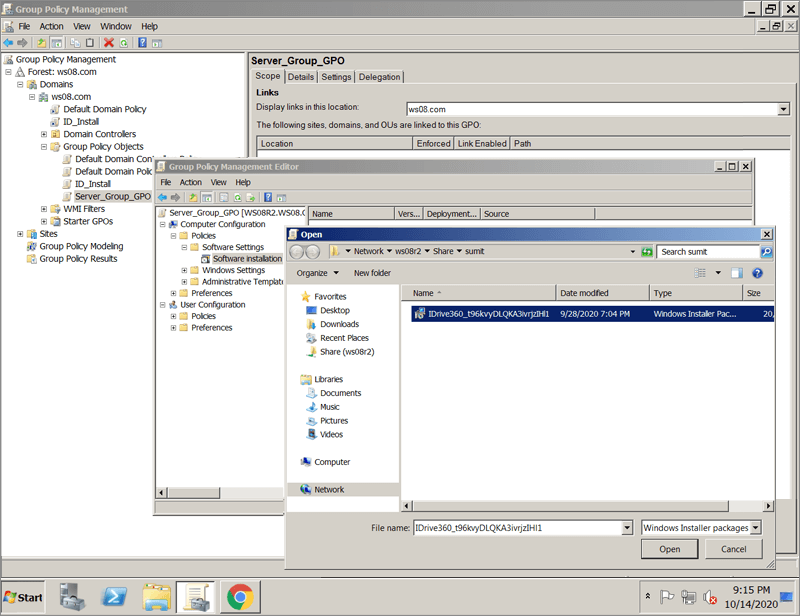
- Locate the shared network folder with the IDrive® 360 MSI installer package.
- Select the package and click 'Open' to add to the software installation container.
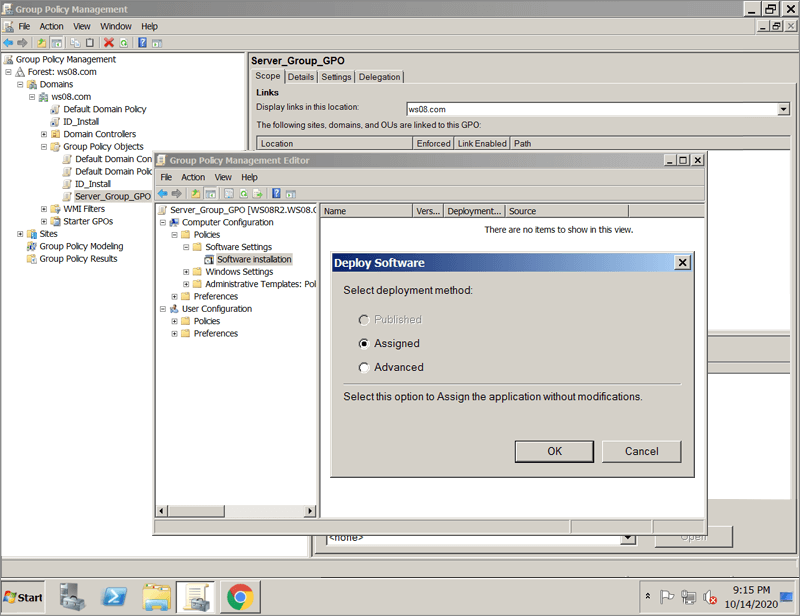
- Select 'Assigned' and click 'OK'. This process may take a while depending on the size of the software.
- Right-click on the MSI package and select 'Properties'. The 'IDrive® 360 Properties' window appears.
- Go to the 'Deployment' tab. Under 'Deployment type', select 'Assigned' and under 'Deployment options', select 'Install this application at logon' for the 'User Configuration' type, and click 'OK'.
- Right-click the domain and select 'Link an Existing GPO'. The 'Select GPO' screen appears.
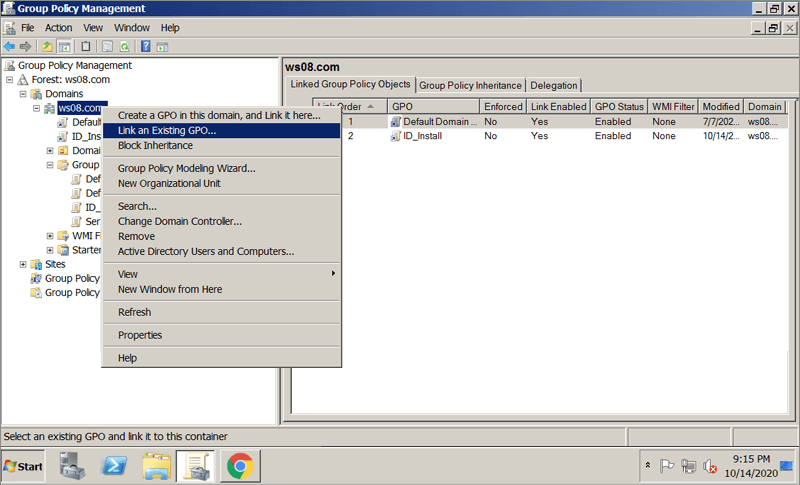
- Select the newly created Group Policy and click 'OK'.
The IDrive® 360 application will be assigned to the domain users on the next sign in and to the domain computers on the next reboot.
Steps to register a set of computers under a particular group via GPO
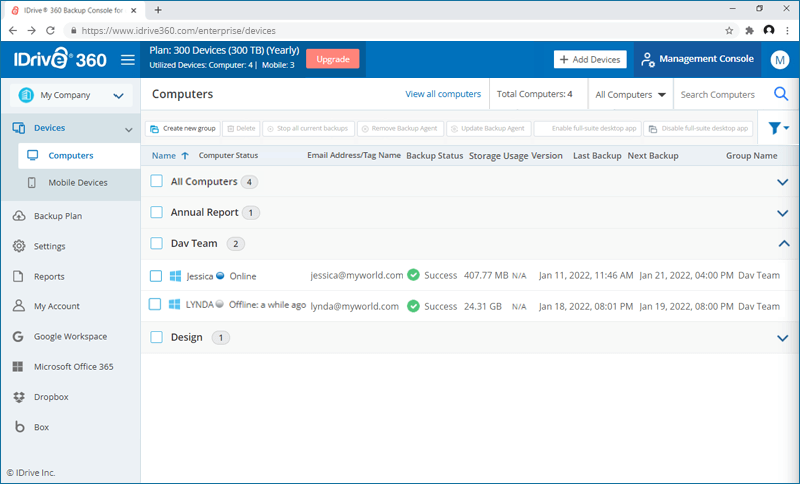
- Choose the type of application you want to install — full-suite or thin client.
- Copy the configuration ID from the 'Add Computers' section in the Backup Console.
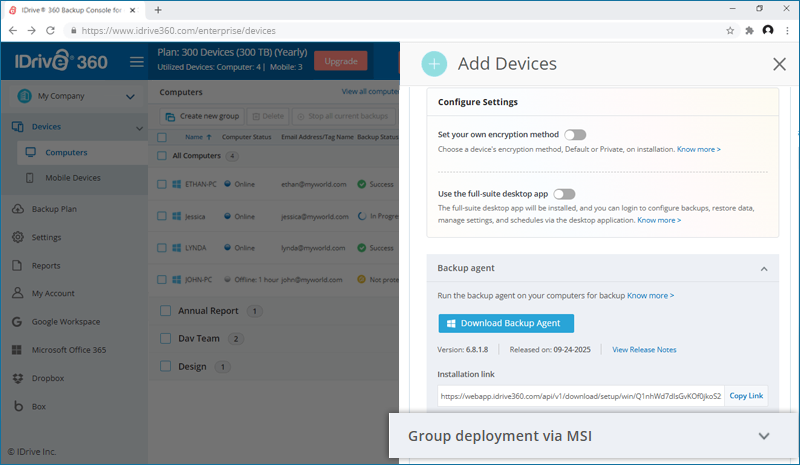
- Create a batch file (eg: IDrive360_Register_Group.bat) with the following command:
msiexec /i "D:\IDrive360
.msi" WRAPPED_ARGUMENTS="/GROUP_NAME=Group_Name /CONFIG_ID=Copied_Configuration ID"Example:
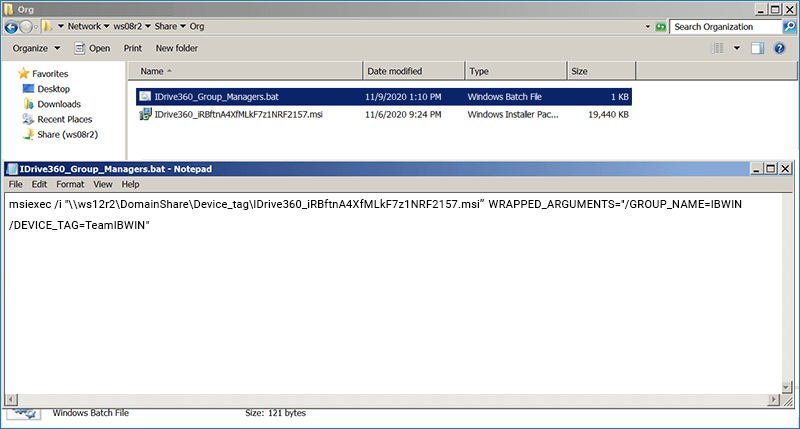
msiexec /i "\\ws08r2\Share\Org\IDrive360_iRBftnA4XfMLkF7z1NRF2157.msi" WRAPPED_ARGUMENTS="/GROUP_NAME=Managers /CONFIG_ID=iRBftnA4XfMLkF7z1NRF2157"where:
- IDrive360_iRBftnA4XfMLkF7z1NRF2157.msi: The setup downloaded from the 'add computers' page. Make sure the file is placed in share and the same is accessible across domain users.
- WRAPPED_ARGUMENTS="/GROUP_NAME=Managers /CONFIG_ID=iRBftnA4XfMLkF7z1NRF2157": The group name is 'Managers' and CONFIG_ID is the configuration ID copied from the 'Add Computers' section in the Backup Console.

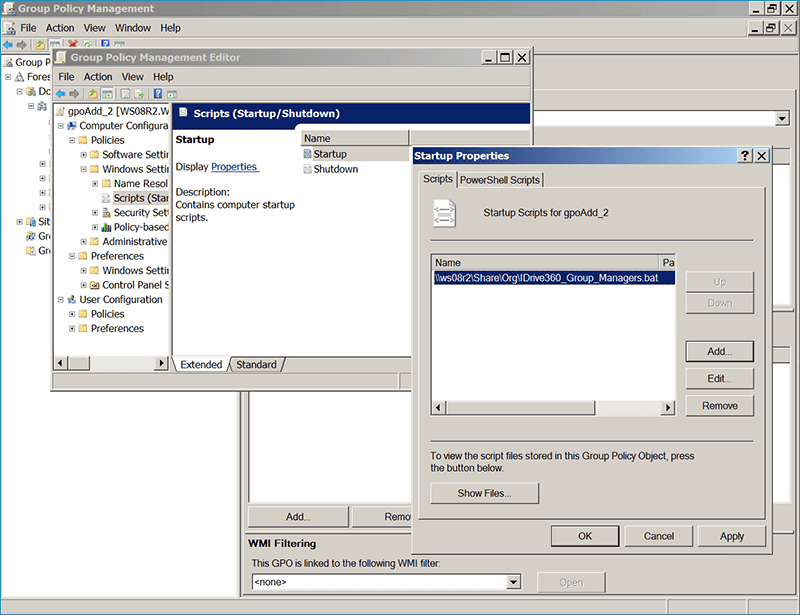
- In the group policy, instead of IDrive® 360 installer, use the batch file.
- Deploy the batch file via GPO to add the computers to respective groups.
- Upon successful deployment, the computers will be listed under the specified group name.
Steps to register a set of computers under a particular group with Private Key encryption method via GPO
- Sign in to your IDrive® 360 account.
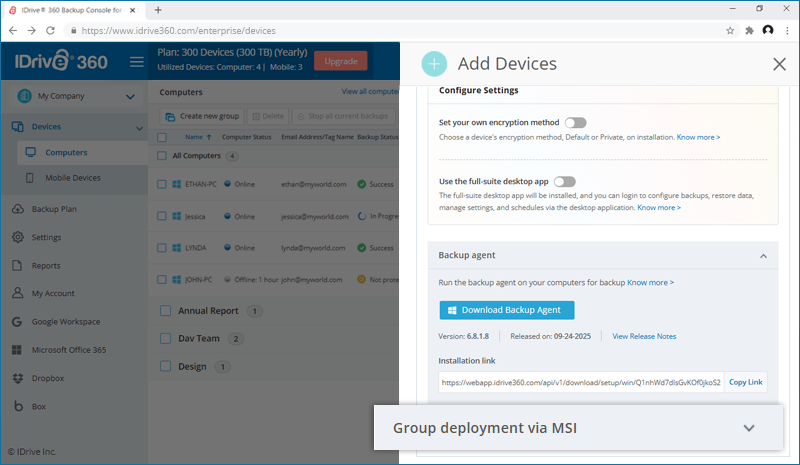
- Click the 'Add Computers' button and enable the 'Set your own encryption method' option.
- Choose the type of application you want to install: full suite or thin client.
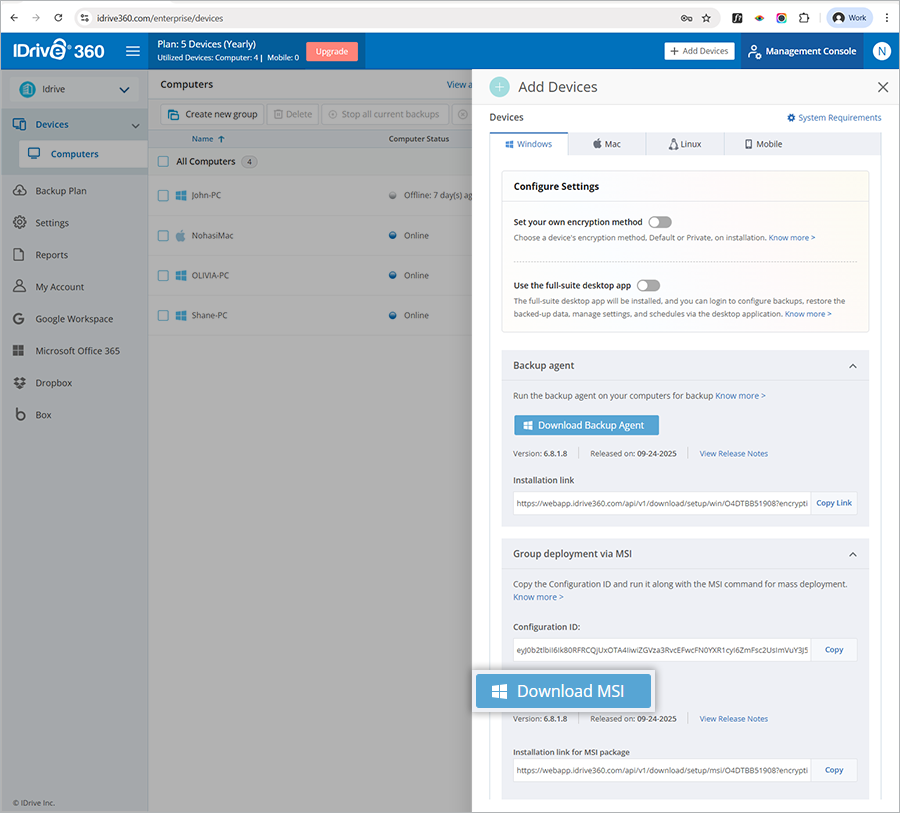
- Copy the configuration ID, and click the 'Download MSI' button to download the IDrive 360 MSI setup with private key encryption option.
- Create a batch file with (eg: IDrive360_Private_Key.bat) with the following command:
msiexec /i "D:\IDrive360_PrivateKey.msi" WRAPPED_ARGUMENTS="/GROUP_NAME=Group_Name /PVT_KEY=Pvt_Key /CONFIG_ID=Copied_Configuration ID"
Example:
msiexec /i "\\ws08r2\Share\Org\IDrive360_iRBftnA4XfMLkF7z1NRF2157_Private.msi" WRAPPED_ARGUMENTS= "/GROUP_NAME=Managers  /PVT_KEY=123456 /CONFIG_ID=iRBftnA4XfMLkF7z1NRF2157"
where:
- IDrive360_iRBftnA4XfMLkF7z1NRF2157_Private.msi: The setup with encryption key option downloaded from the 'add computers' page. Make sure the file is placed in share and the same is accessible across domain users.
- WRAPPED_ARGUMENTS="/GROUP_NAME=Managers /PVT_KEY=123456 /CONFIG_ID=iRBftnA4XfMLkF7z1NRF2157": The group name is 'Managers', the private key is '123456', and the Configuration ID obtained from the 'Add Computers' section in the Backup Console.
Note:
The encryption key must contain a minimum of 6 characters and a maximum of 250 characters. - In the group policy, use the created batch file to deploy the setup.
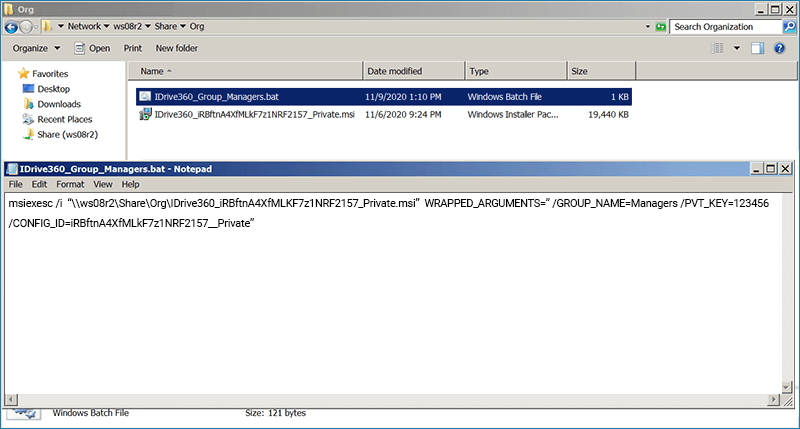
- Deploy the batch file via GPO to add the computers to respective groups with the private encryption option.

- Upon successful deployment, the computers will be listed under the specified group name with the specified private encryption key.

- Always make sure to use the same private encryption key during any re-installation as used during the original installation.
- IDrive® 360 does not store your private encryption key on its servers. It is recommended that you archive it safely to back up and restore your data. However, if you choose the default encryption key, you need not remember it.
Note:
Steps to register a set of computers with a tag name
- Copy the configuration ID from the 'Add Computers' section in the Backup Console.

- Create a batch file with (eg: IDrive360_Register_Group.bat) with the following command:
msiexec /i "sharepath of the MSI setup file" WRAPPED_ARGUMENTS="/GROUP_NAME=groupname /DEVICE_TAG=Tag/Email address"
Example:
 msiexec /i "\\ws12r2\DomainShare\Device_tag\IDrive360_iRBftnA4XfMLkF7z1NRF2157.msi" WRAPPED_ARGUMENTS= "/GROUP_NAME=IBWIN /DEVICE_TAG=TeamIBWIN"
where:
- IDrive360_iRBftnA4XfMLkF7z1NRF2157.msi : The setup downloaded from the 'add computers' page. Make sure the file is placed in share and the same is accessible across domain users.
- WRAPPED_ARGUMENTS="/GROUP_NAME=IBWIN : The group name is 'IBWIN'.
- /DEVICE_TAG=TeamIBWIN is the parameter for the user to define the TAG name or email address.
-
In the group policy, instead of IDrive® 360 installer, use the batch file.

- Deploy the batch file via GPO to add the computers to respective groups.

- Upon successful deployment, the computers will be listed under the specified group name.
