Express™
IDrive® e2 Express™ allows quick data backup via a temporary physical storage device.
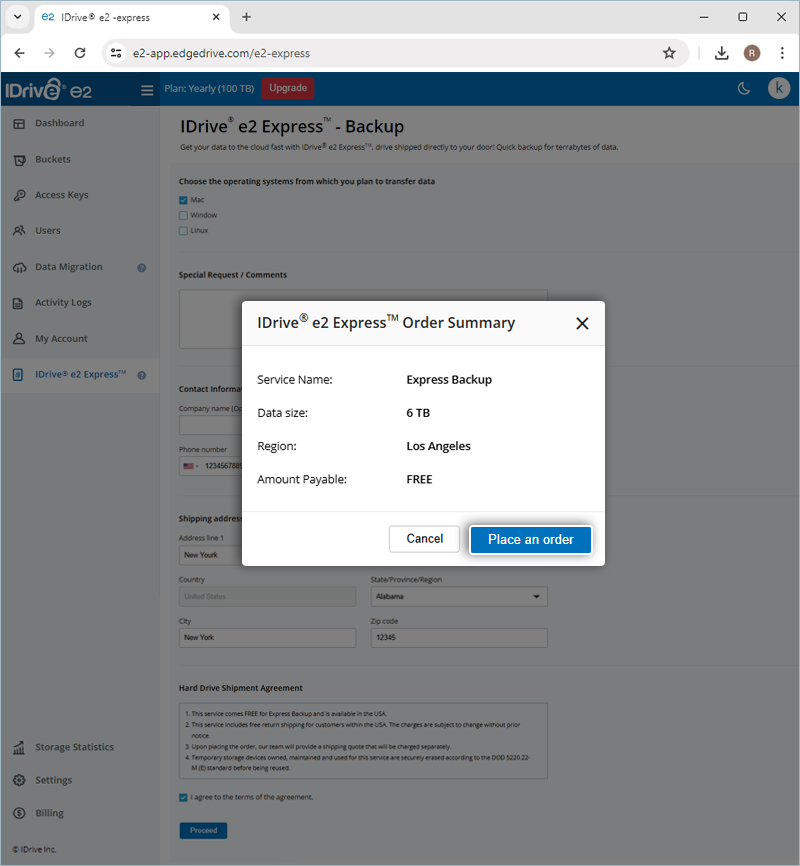
This service comes FREE for Express Backup and is available in the USA. The charges are subject to change without prior notice. Upon placing the order, our team will provide a shipping quote that will be charged separately.
Benefits
- You can quickly upload several TBs of data to your IDrive® e2 cloud storage.
- Your data is secured with AES 256-bit encryption throughout the process.
- Temporary storage devices owned, maintained, and used for this service are securely erased according to the DOD 5220.22-M (E) standard before reusing.
- No bandwidth usage during the data transfers.
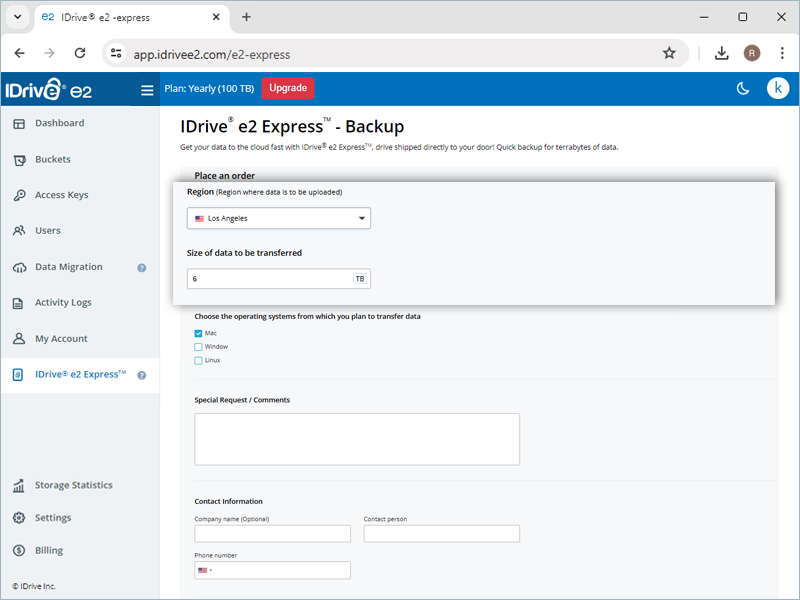
To place an order for IDrive® e2 Express™ drive,
- Sign in to the IDrive® e2 web console.
- Navigate to the IDrive® e2 Express™ tab.
- Select the Region and enter the Size of data to be transferred.
- Choose the operating systems from which you wish to transfer data.
- Add special requests or comments.
- Provide your contact details like name and phone number.
- Enter valid shipping information complete with Address line, City, and Zip code.
- Review the Hard Drive Shipment Agreement and agree.
- Click Proceed.

- Click Place an order to confirm your order.
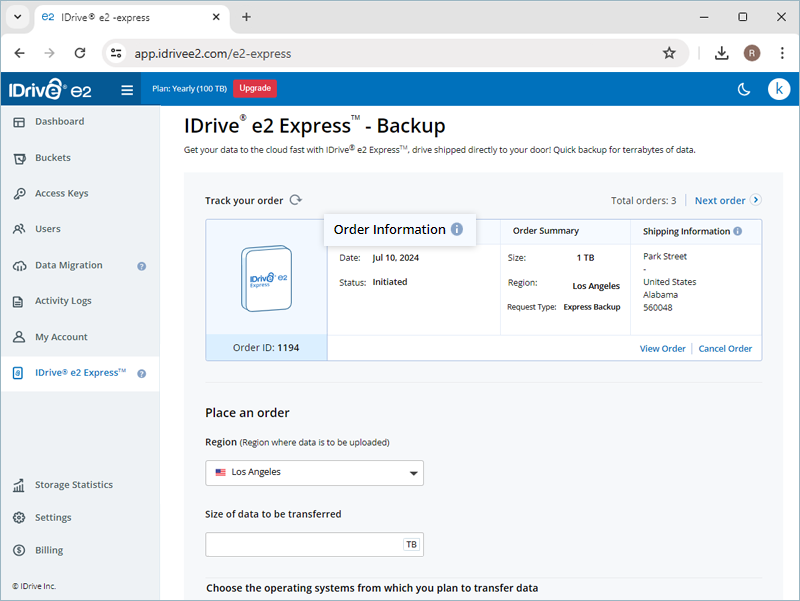
- You can review the details of your Express Backup order.
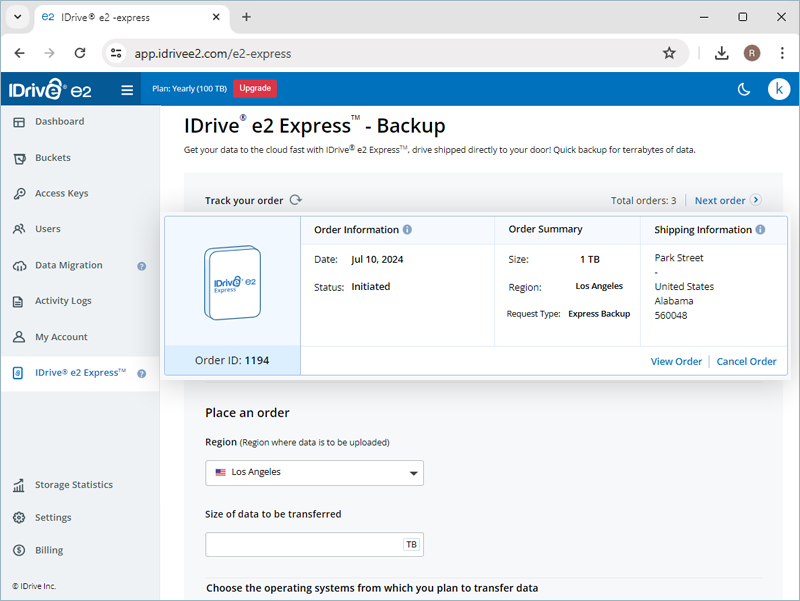
- Click Order Information if you wish to edit region, storage, or shipping details.
 Note:
Note: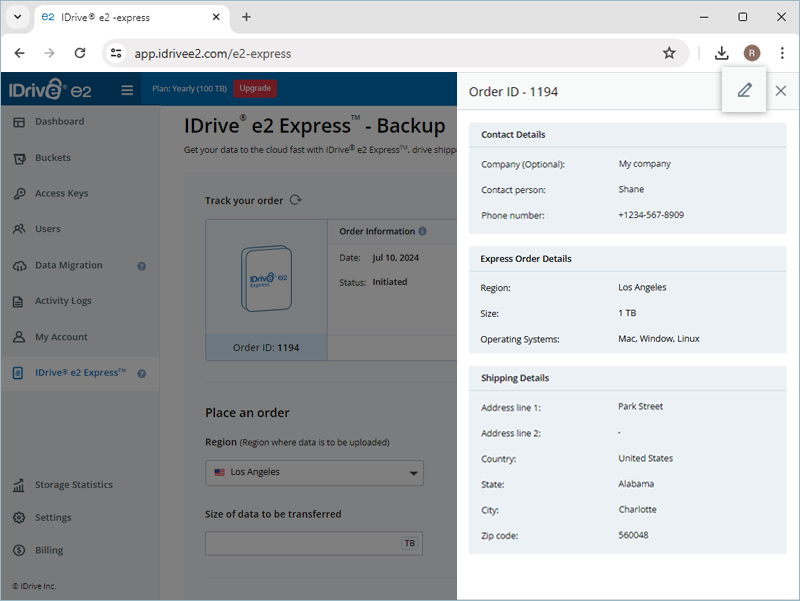
- Order details can be edited until the order status is Initiated.
- The billing address can be edited until the order status is In progress.
- Orders can be canceled until the order status is Initiated or In progress.
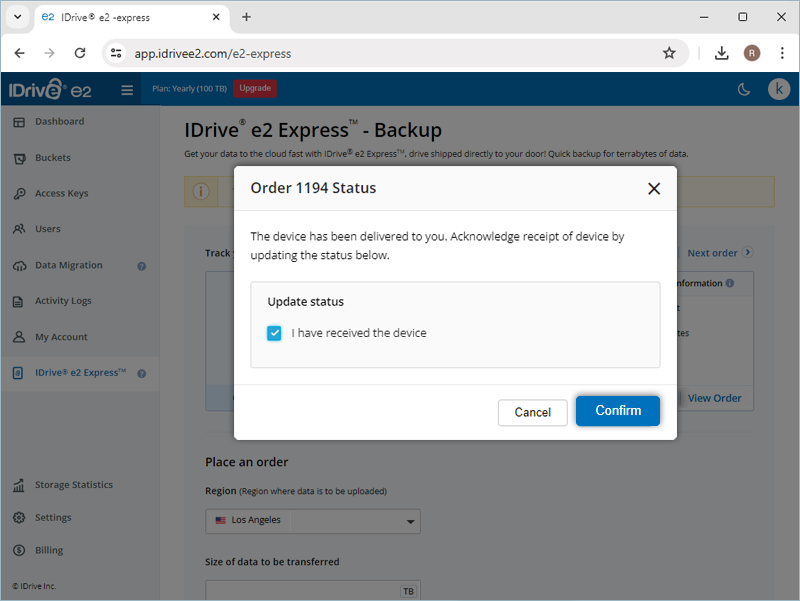
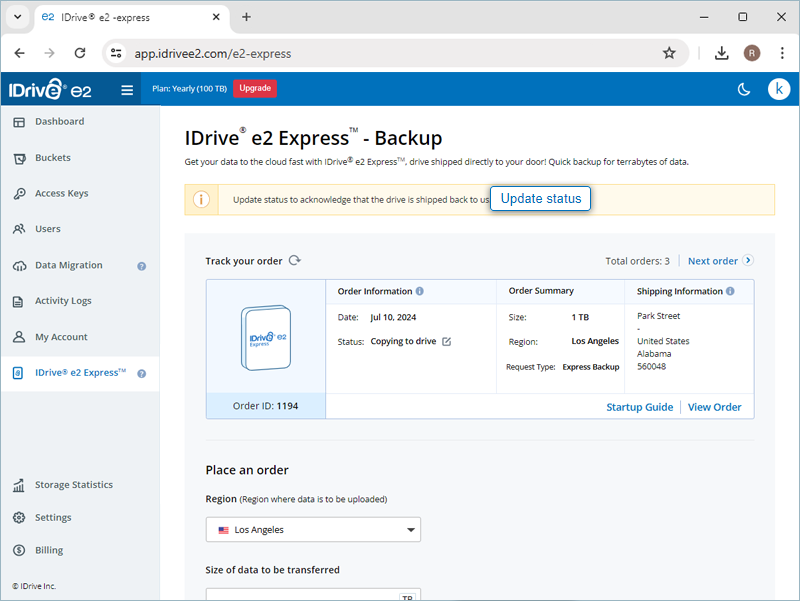
Once you receive the Express drive, to update status
- Sign in to the IDrive® e2 web console.
- Navigate to the IDrive® e2 Express™ tab.
- Sign in to your account and click Update status.

- Acknowledge the receipt of the device and click Confirm.
I have several TBs of data. How can I quickly upload this to my cloud storage without clogging up Internet bandwidth?
Backing up large data can be done online, but may take several days, often weeks. Use IDrive® e2 Express™ drive to transfer bulk data physically.
To upload data from your device:
- Once you receive the USB hard drive, connect it to your computer using the USB cable.
- Sign in to your account and click Get Started.
- Download and run the Express Agent application on your machine.
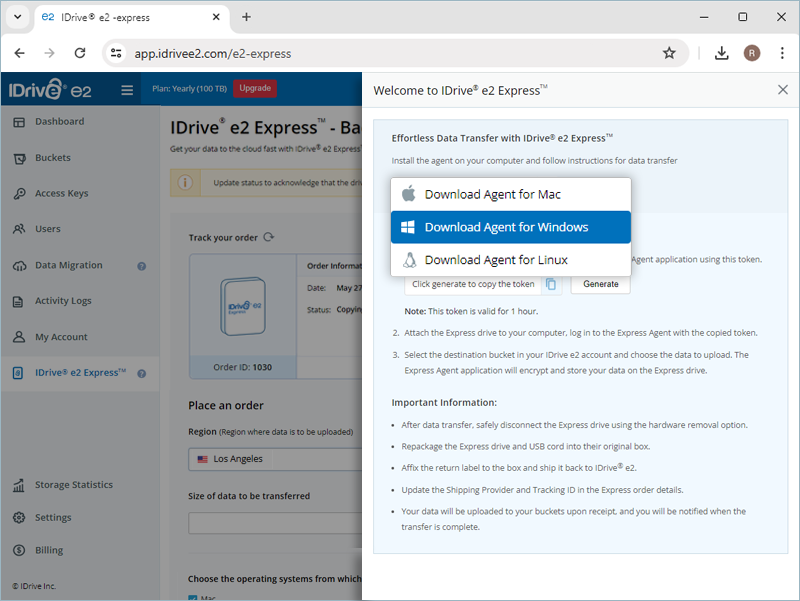
- Click Generate to get an authentication token for your Express Agent application.
Note: This token is valid for 1 hour.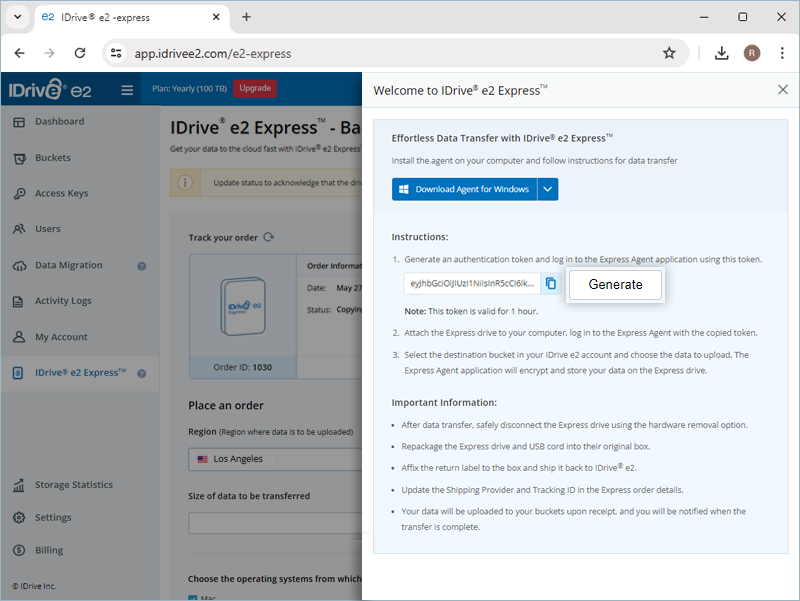
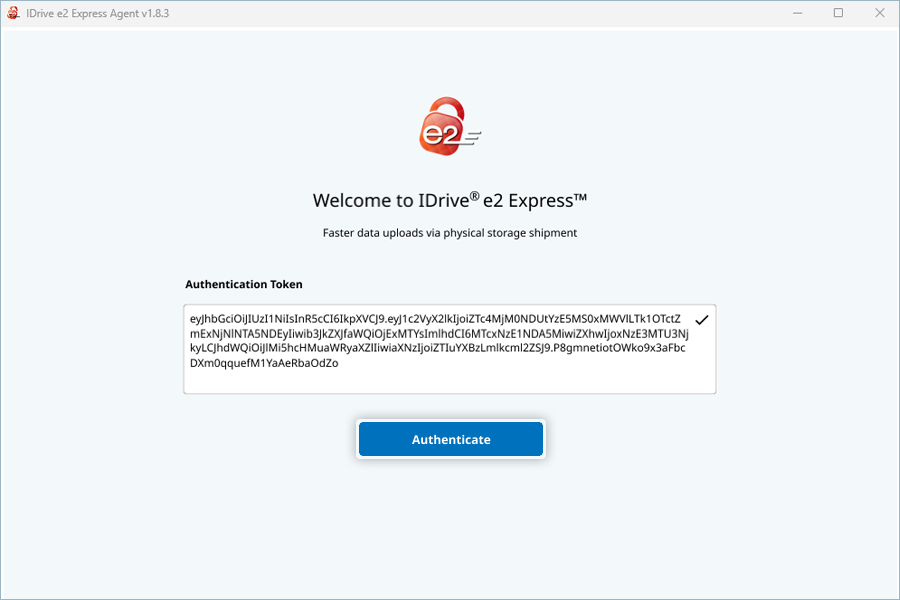
- Copy the generated token, enter it in the Express Agent application, and click Authenticate.
- Make sure the Express drive (shipped to you) is connected to your system before logging in.
- The Express Agent application will detect the attached Express drive automatically.
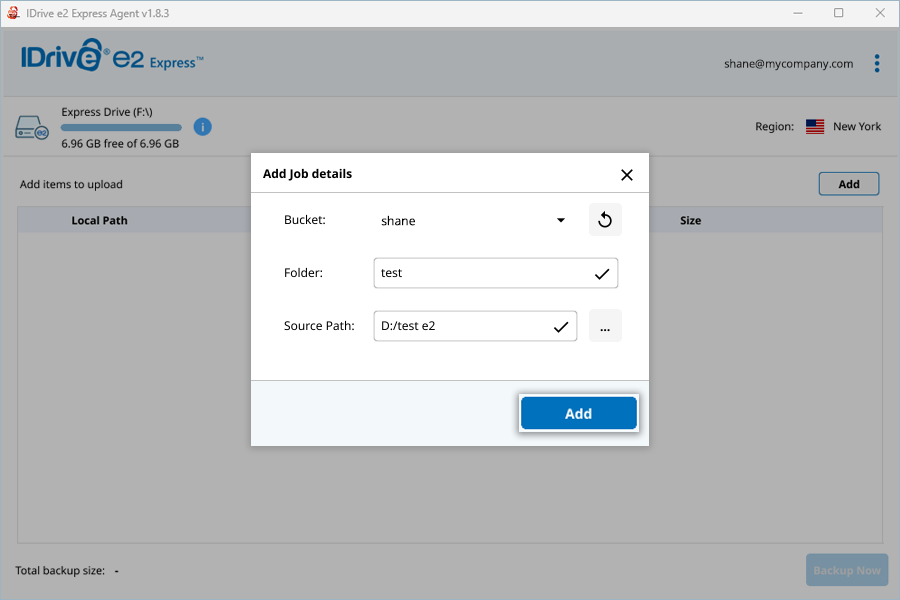
- Click Add to enter the source and destination for upload:
- Select the IDrive ® e2 bucket where you wish to upload the data from the dropdown.
- Specify a folder inside the bucket to upload data, if required.
- Click
 to select the data that needs to be uploaded.
 - Click Add.
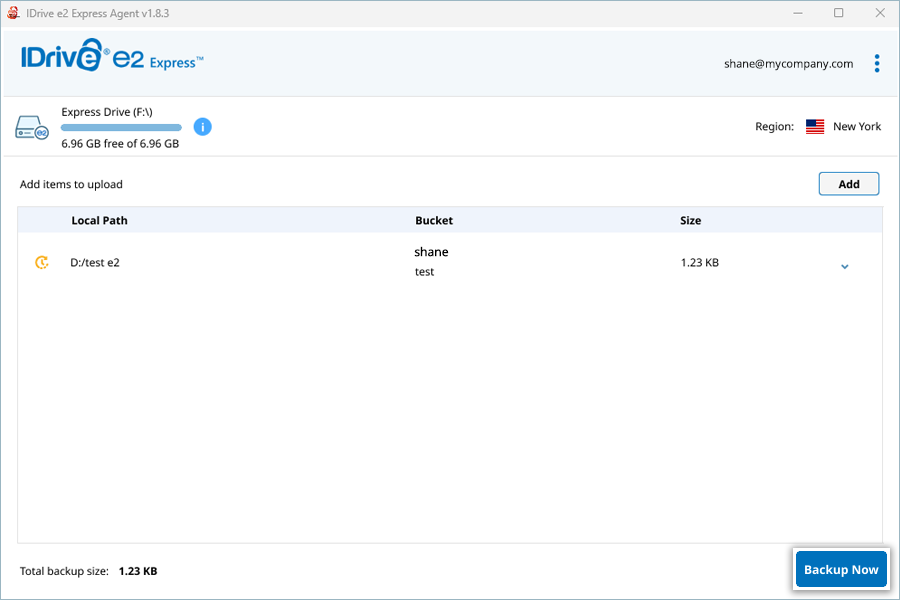
- Click Backup Now. The Express Agent application will encrypt and store the data onto the Express drive.
- Disconnect the hard drive using the Safely remove hardware option.
- Repackage the Express drive and the USB cord into the box they arrived in.
- Place the return label on the box and ship it back to IDrive® e2.
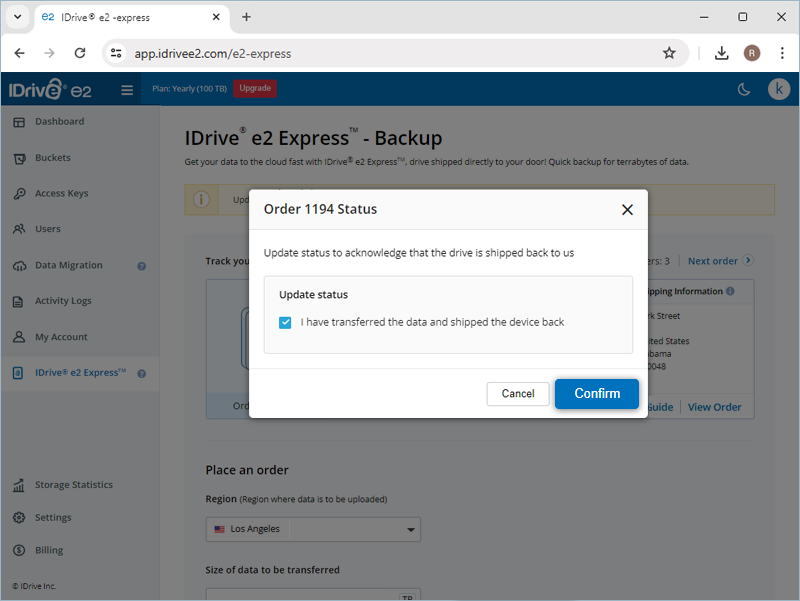
- Once you have shipped the drive back, log in to your account and click Update status.
- Acknowledge that the drive is shipped back to us and click Confirm.
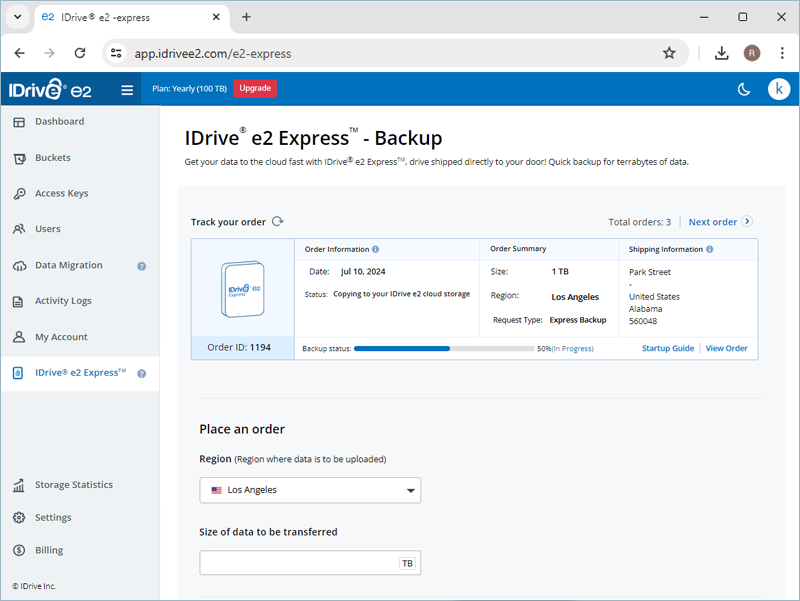
- The data on the Express drive will be uploaded to your buckets once we receive it. You can track the progress of data upload.
You will be notified to verify the data once it is uploaded to the buckets.
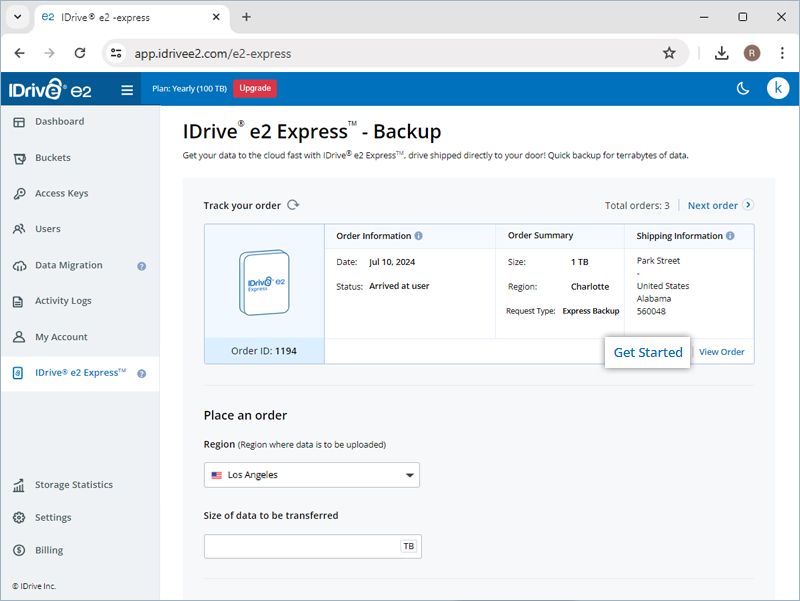
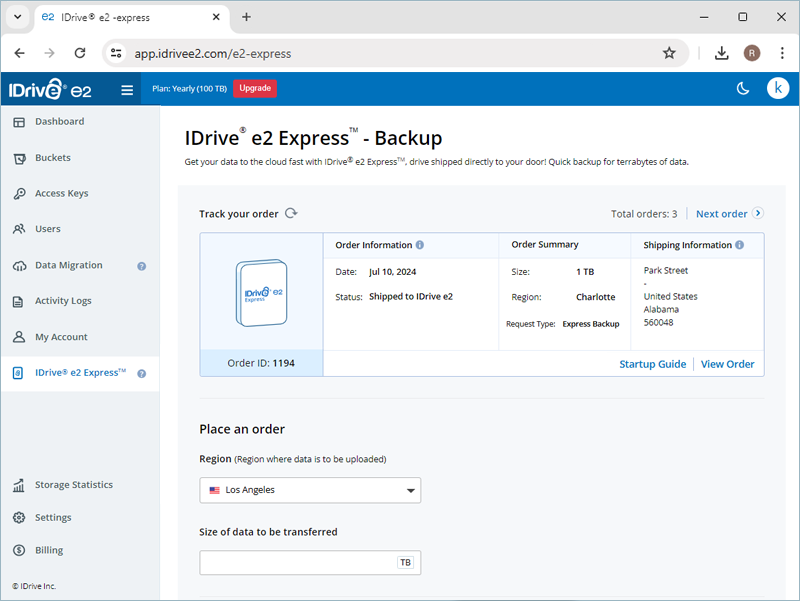
To know the status of your IDrive® e2 Express™ order,
- Sign in to your IDrive® e2 account.
- From the IDrive® e2 Express™ tab, you can get your order details under the Track your order section.
Once we receive the IDrive® e2 Express™ drive with your data, it typically takes 2 to 5 business days to transfer the data to your IDrive® e2 account. Occasionally, it may take longer than 10 days due to high volume.
Yes, you can upload data from multiple devices. You do not need to fill out the hard drive shipment form for additional devices.
To upload data from multiple devices,
- Download and install the IDrive® e2 Express Agent application on each device.
- Click Generate to get an authentication token for your Express Agent application.
Note: This token is valid for 1 hour. - Copy the generated token, enter it in the Express Agent application, and click Authenticate.
- Make sure the Express drive (shipped to you) is connected to your system before logging in.
- The Express Agent application will detect the attached Express drive automatically.
- Click Add to enter the source and destination for upload:
- Select the IDrive ® e2 bucket where you wish to upload the data from the dropdown.
- Specify a folder inside the bucket to upload data, if required.
- Click to select the data that needs to be uploaded.
- Click Add.
- Click Backup Now. The Express Agent application will encrypt and store the data onto the Express drive.
- Disconnect the hard drive using the Safely remove hardware option.
- Repeat steps 1 through 8 for each additional device.
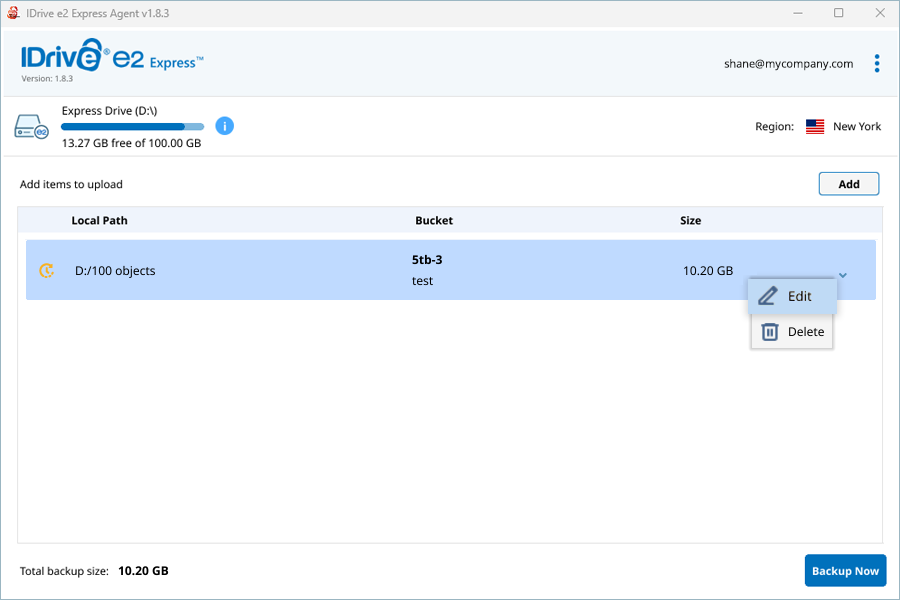
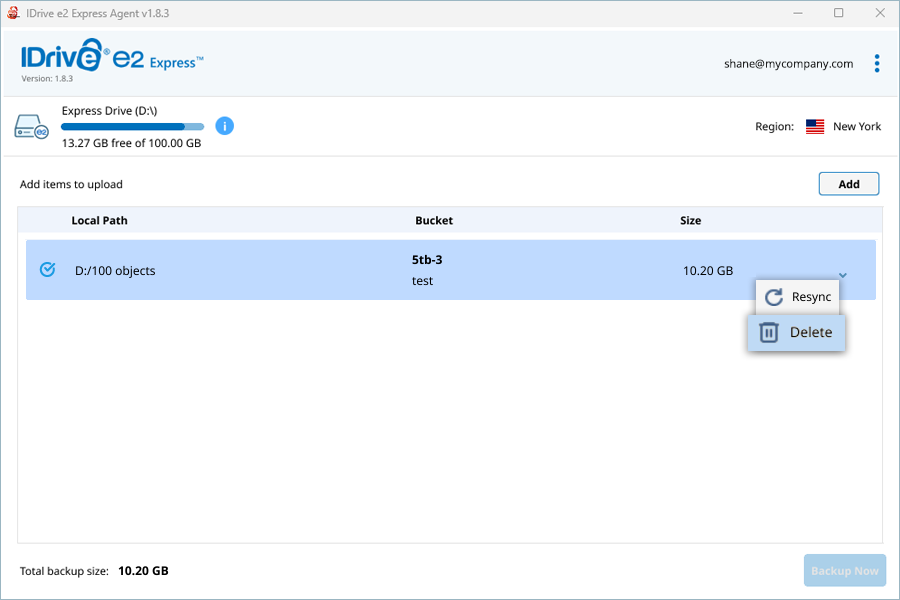
You can use the Express Agent Application to transfer data from your devices to the Express drive. Additionally you can perform the following operations:
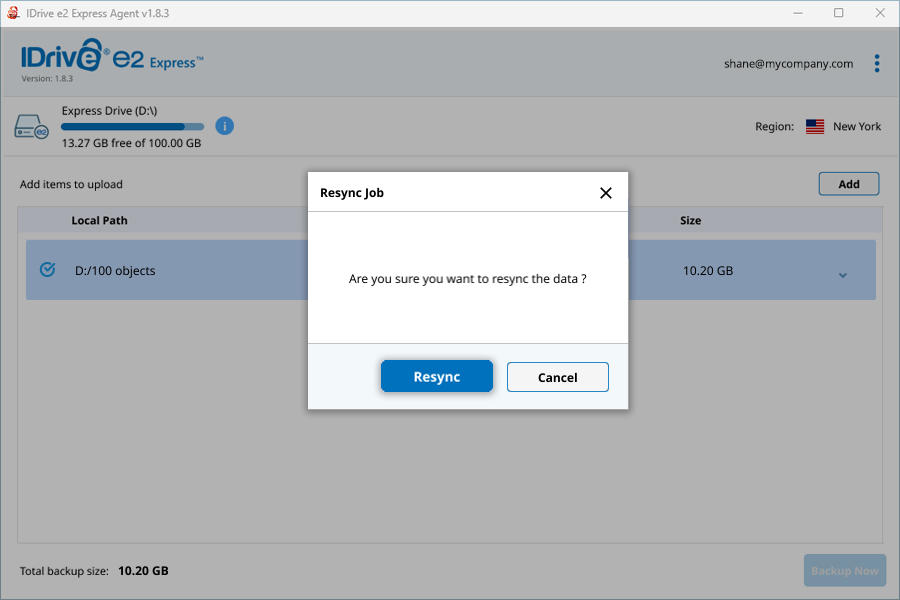
- Resync - Resync data that was changed in your device after being transferred to the Express drive.

- Edit - Modify the selected bucket and folder before starting the data transfer operation.
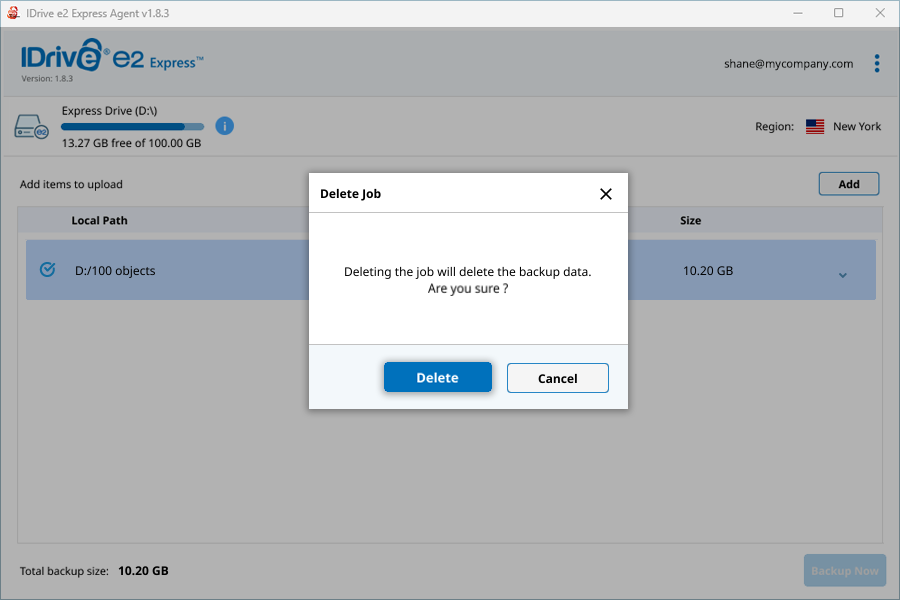
- Delete - Delete a data transfer job. Any data transferred to the Express drive will also be deleted.
- Stop/Restart - Stop and resume an ongoing data transfer operation.
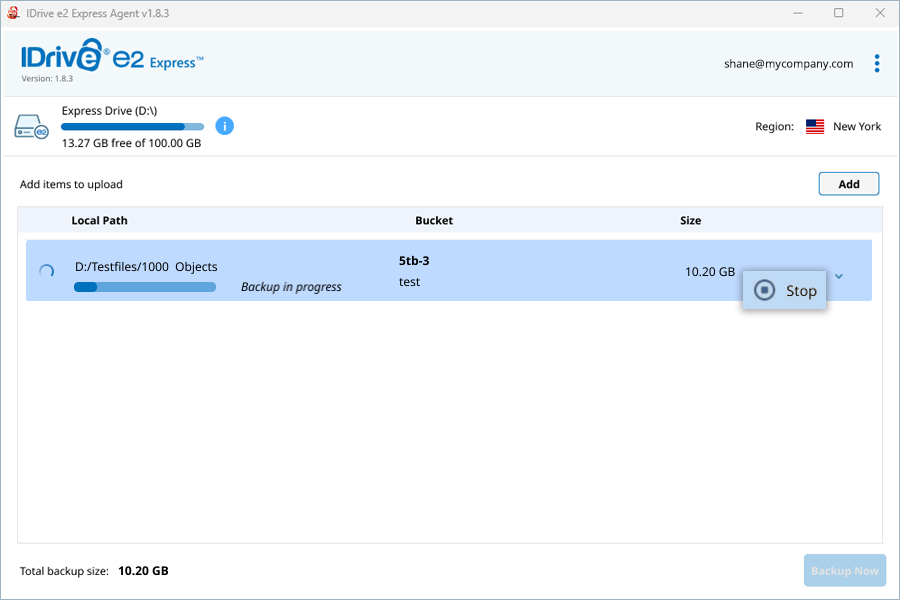
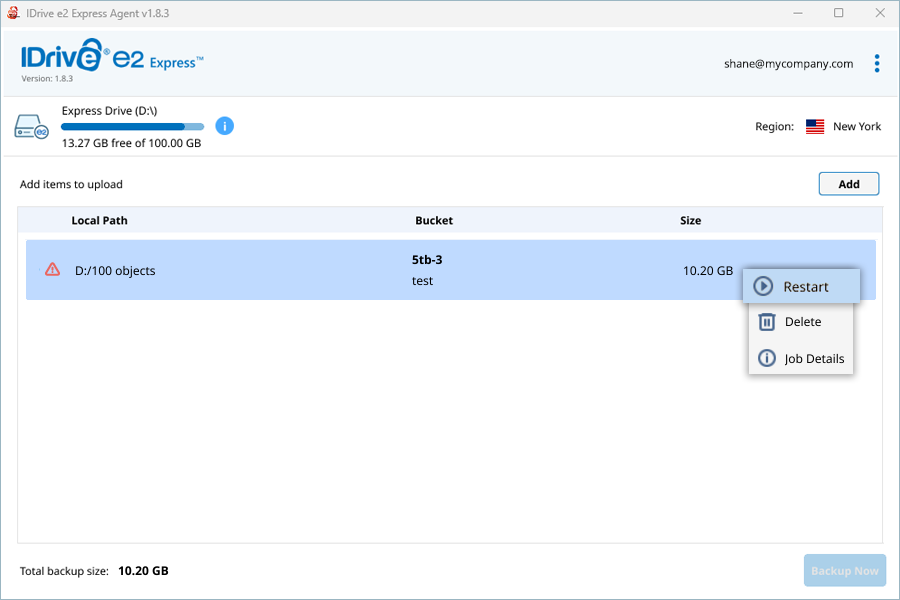
- Backup summary - View detailed summaries for successful data transfers. View detailed logs for failed and stopped data transfers.
To avoid losing data, ejecting an IDrive® e2 Express USB device before disconnecting from the computer is essential.
Follow the steps below to eject an IDrive® e2 Express device on different operating systems:
For Mac:
- Select the IDrive® e2 Express device and then click Eject.
- In the Finder sidebar, click Eject
 next to the device's name.
Note: You can eject the IDrive® e2 Express device from connected optical drives using the Eject menu.
For Windows
- Go to Taskbar and click
 . If you don't see it, select
  . Press and hold (or right-click) the icon and choose the hardware you want to remove.
 - If you can't find the , press and hold (or right-click) the taskbar and select
 .
. - Select Taskbar corner overflow. Scroll to Windows Explorer (when you hover over it, the tooltip will read Safely Remove Hardware and Eject Media) and turn it on.
- If this doesn't work, make sure the device has stopped all activity, such as copying or syncing files.
Select Start > Settings
  > Bluetooth & devices
  > Devices
  .
. - Select More against the device, and select Remove device.
For Linux
To eject a removable device,
- Go to Activities overview and open Files.
- Look for the IDrive® e2 Express device in the sidebar. It should have a small eject icon next to the name. Click
 to safely remove or eject the device.
Alternatively, right-click the device's name in the sidebar and select Eject.
To eject a device that is in use,
If any of the files on the device are open and in use by an application, you cannot safely remove the device. You will be prompted with a window telling you Volume is busy.
To safely remove the device:
- Click Cancel.
- Close all the files on the device.
- Click to safely remove the device.
- Alternatively, right-click the device's name in the sidebar and select Eject.
You can also choose Eject Anyway to remove the device without closing the files. However, this may cause errors in applications that have those files open.