Sales management
To create a task,
- Sign in to your IDrive® CRM account.
- Navigate to Sales. The Tasks page will open.
- Click Create Task.
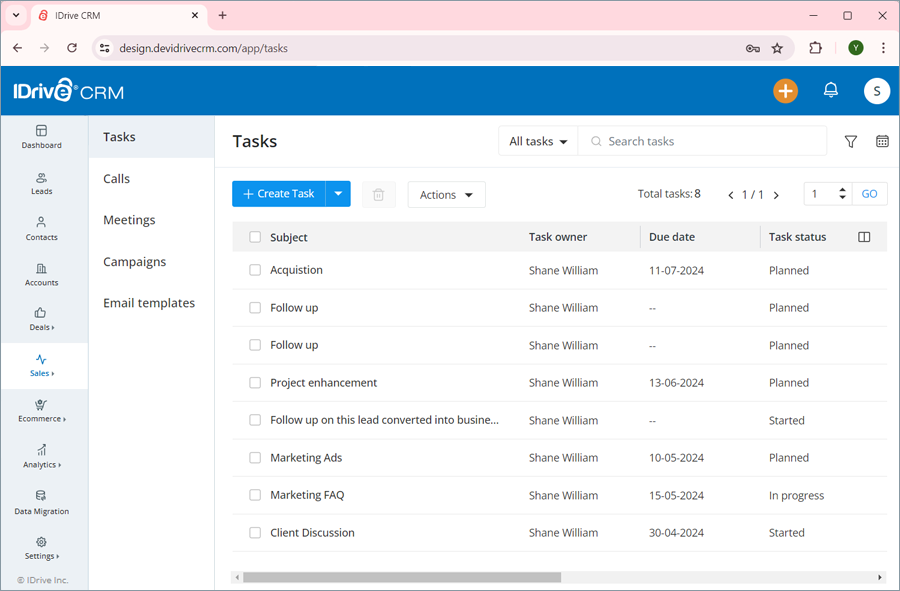
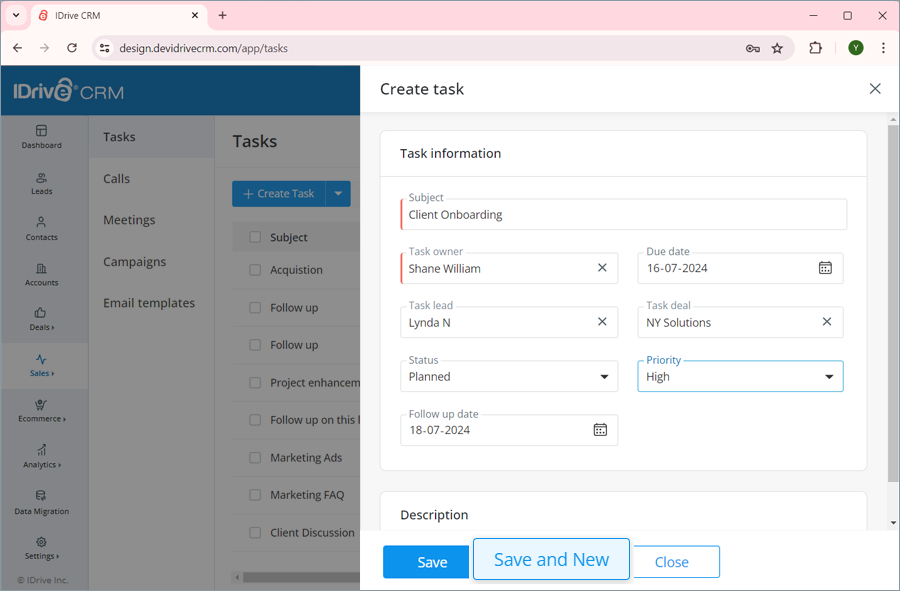
- Enter the task subject. The task owner will be defined by default. To change the default task owner, click
 and choose a user from the dropdown list or create a new user.
 - Select a closing date, lead, and deal that you want to add to the task. Set the status, priority level, and follow-up date for the task. Add any extra information under Description. These fields are optional.
- Click Save to create the task. On successful creation of the task, it will be listed on the Tasks page.
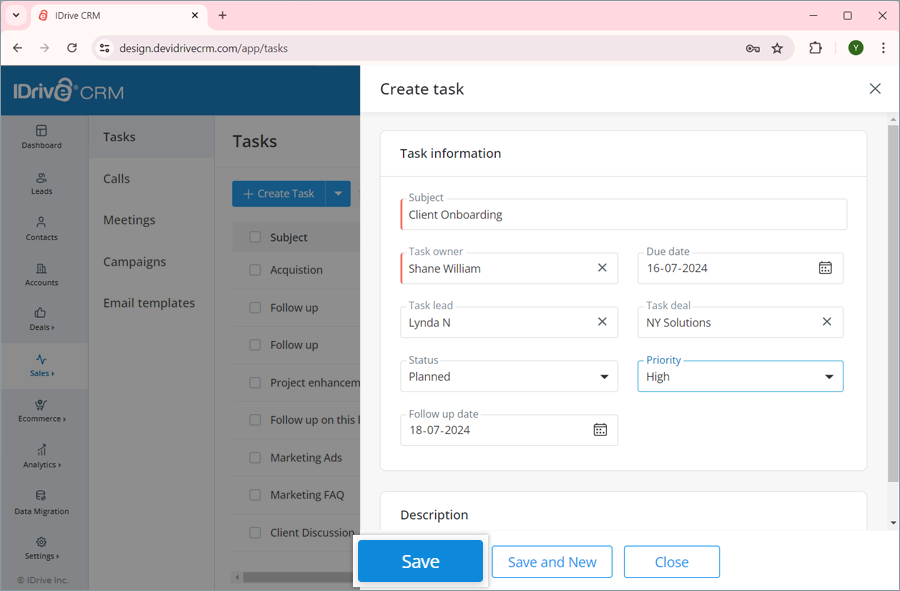
- Alternatively, click Save and New if you want to create the task and open a new create task form simultaneously.
Note: You can also import your existing tasks in CSV file format.
Yes, you can edit a task.
To edit a task,
- Sign in to your IDrive® CRM account.
- Navigate to Sales. The Tasks page will open.
- Hover on the task that you want to edit and click

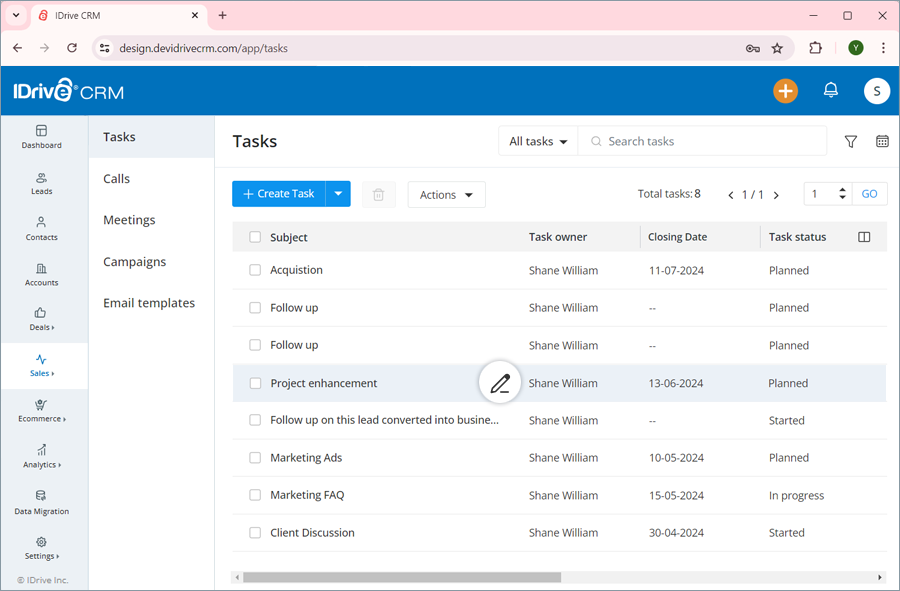
The edit task screen will appear. - Modify the details as required.
- Click Save to save changes.
Click ![]() to access the view pane. The updated task information will be displayed on the screen. You can make further changes to the task information by clicking the Edit button.
to access the view pane. The updated task information will be displayed on the screen. You can make further changes to the task information by clicking the Edit button.
Is it possible to update specific fields in multiple records simultaneously for a task in my account?
Yes, you can mass update the values for specific fields across multiple records for a task simultaneously.
To perform mass update for a task,
- Sign in to your IDrive® CRM account.
- Navigate to Sales. The Tasks page will open.
- Click Mass Update from the Actions dropdown menu.
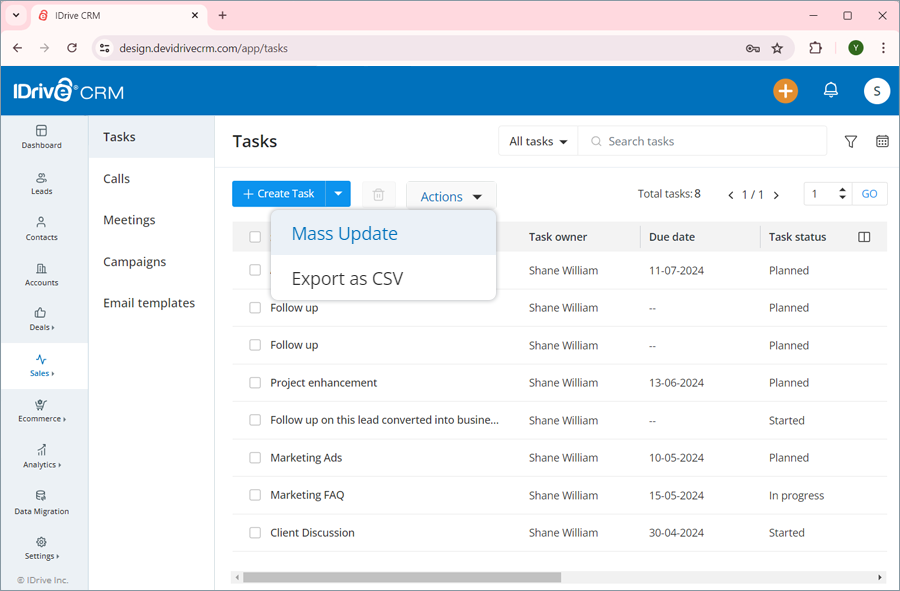
- Filter the tasks as per the required criteria and click Search.
- Select the tasks that you want to update and click Mass Update.
- Select the property and enter the modified values for the selected property under Update value.
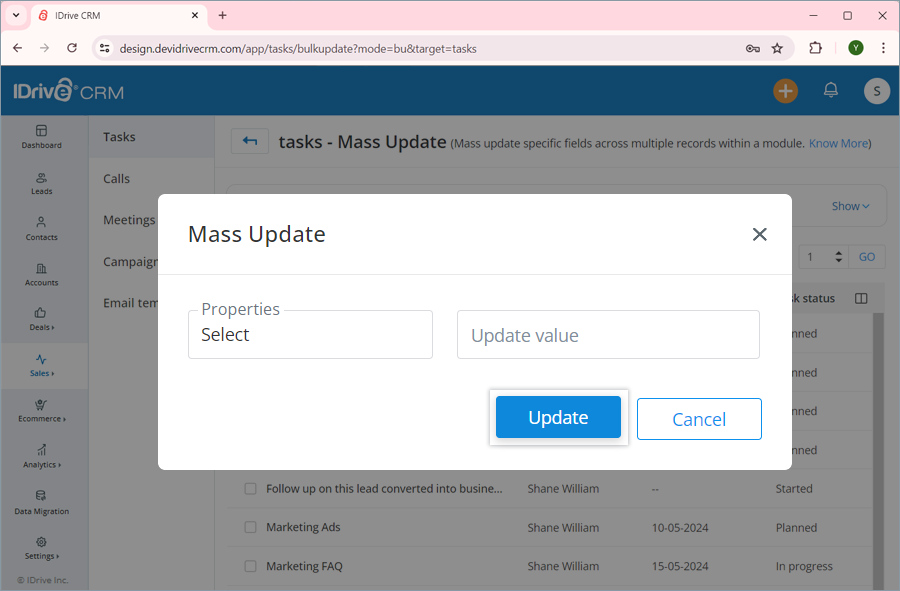
- Click Update.
Similarly, you can also mass update the value of specific fields across multiple tasks in your account in one go.
You can view and edit contact information, clone, and delete the task by clicking the respective buttons on the view pane. You can also view the following:
- Info - View task information.
- Note - View notes or add a new note.
- History - View activity logs.
To open the view pane for a particular task, click anywhere on the task row.
Yes, you can create a clone of a task.
To clone a task,
- Sign in to your IDrive® CRM account.
- Navigate to Sales. The Tasks page will open.
- Click anywhere on the task you want to clone. The view pane will appear.
- Click
 and select Clone from the dropdown.
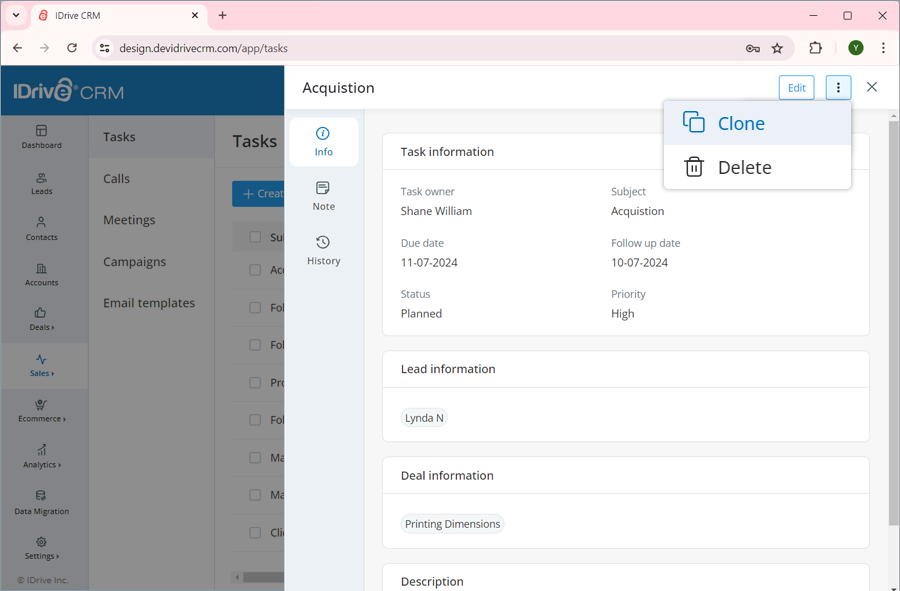
- Make changes to the task details.
- Click Clone.
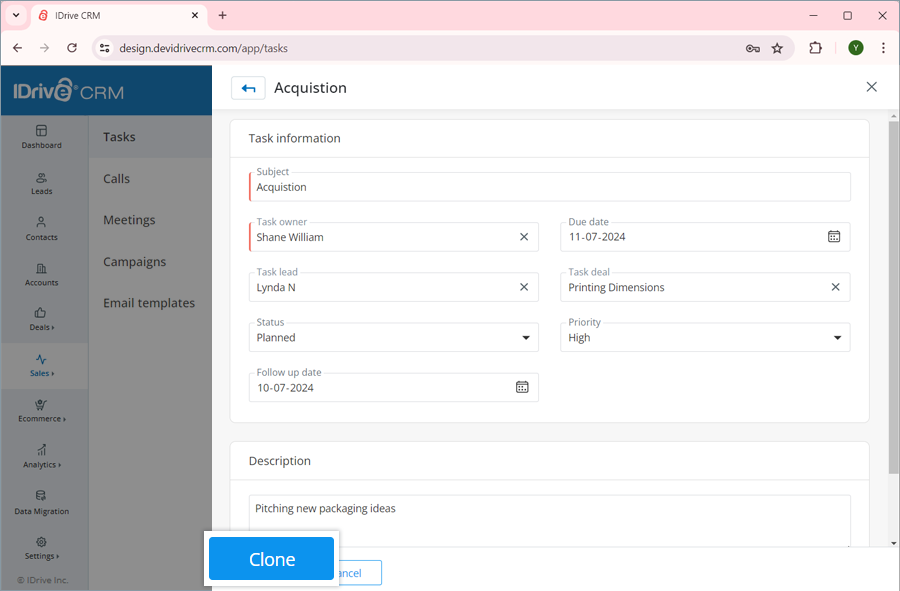
Note: You cannot create a duplicate task. You should make changes to the task details to create a clone.
To find all your tasks for a specific day,
- Sign in to your IDrive® CRM account.
- Navigate to Sales. The Tasks page will open.
- Click the dropdown button.
- Select My today's tasks from the dropdown menu.
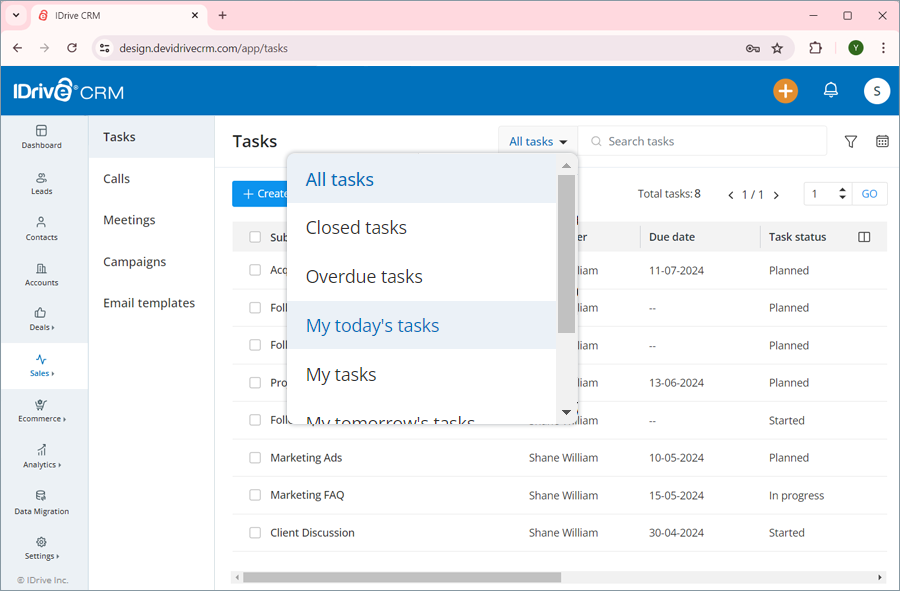
A list of all your tasks for the current day will be displayed on the screen.
Alternatively, to view the following select the respective button:
- All tasks - all the tasks in the account
- Closed tasks - all the closed tasks in the account
- Overdue tasks - all the tasks in the account that have passed the closing date
- My tasks - all your tasks
- My tomorrow's tasks - all your tasks for the next day
- My closed tasks - all your closed tasks
- My overdue tasks - all your tasks that have passed the closing date
Yes, you can search for a specific task in your account.
To search a task,
- Sign in to your IDrive® CRM account.
- Navigate to Sales. The Tasks page will open.
- Enter the task name in the Search tasks field.
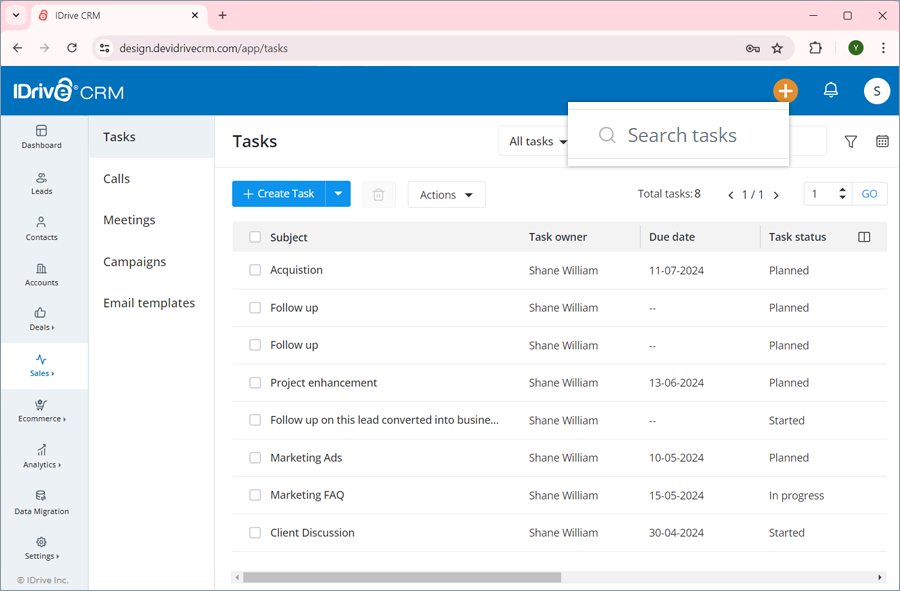
All the tasks matching the search term will be displayed on the screen.
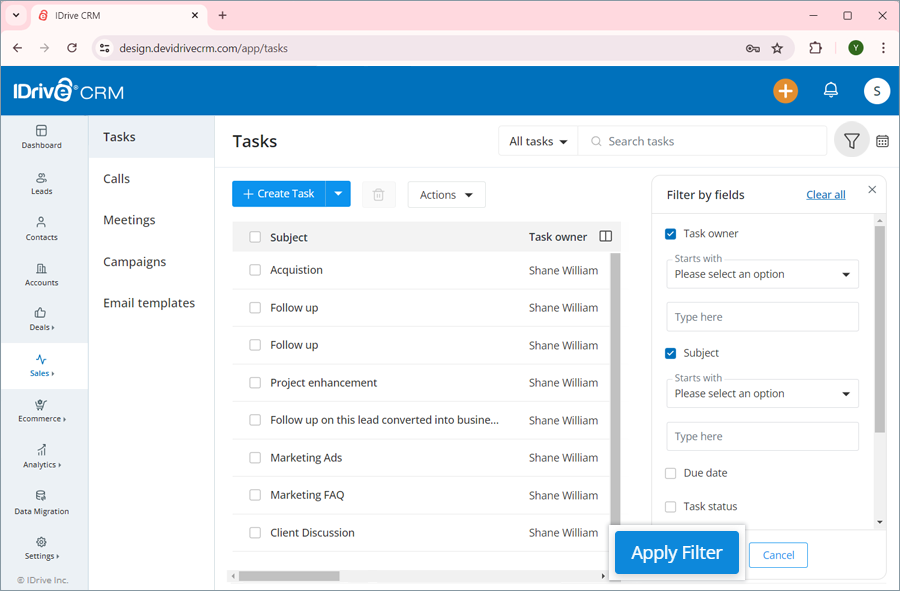
To filter tasks by fields such as task owner, subject, or any other column heads,
- Sign in to your IDrive® CRM account.
- Navigate to Sales. The Tasks page will open.
- Click Custom filters.
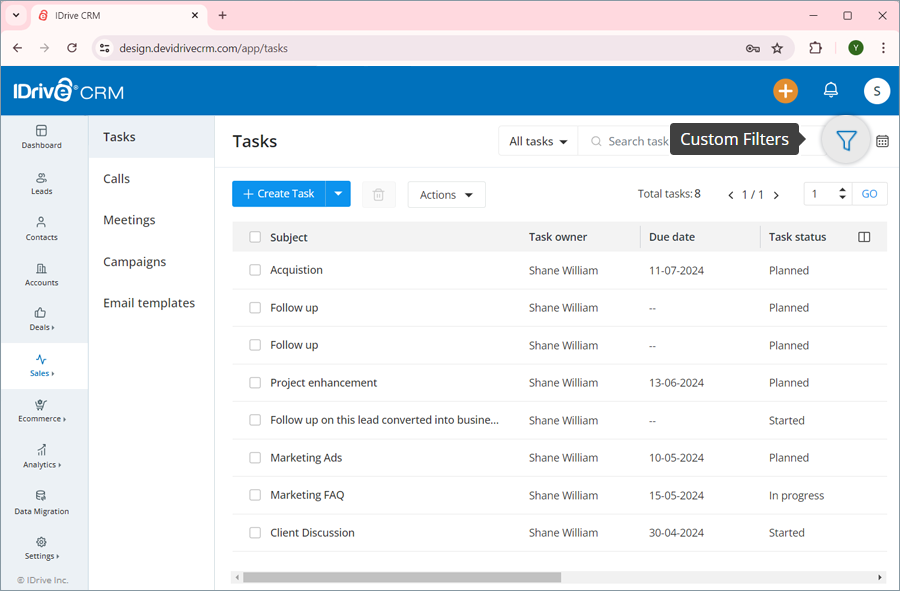
- Select the filter that you want to apply from the Filter by fields dropdown list.
- Click Apply Filter. Click Clear all to remove all the selected filters.
To filter tasks by time,
- Click Date filter.
- Select the filter that you want to apply from the dropdown.
- If you wish to customize the time period for search, click Custom range and set a specific date and time on the calendar.
- Click Apply. A list of all the tasks created/imported within that specific time period will be displayed on the screen.
You can also filter the number of records to be displayed on the page by selecting the desired option from the records per page dropdown.
You can export up to 5000 task records from your IDrive CRM account to your computer using a CSV file. Contact support to export records of larger volumes.
To export a task detail,
- Sign in to your IDrive® CRM account.
- Navigate to Sales. The Tasks page will open.
- Select the task for which you want to export the details.
- Click Export as CSV from the Actions dropdown menu. A popup window will appear.
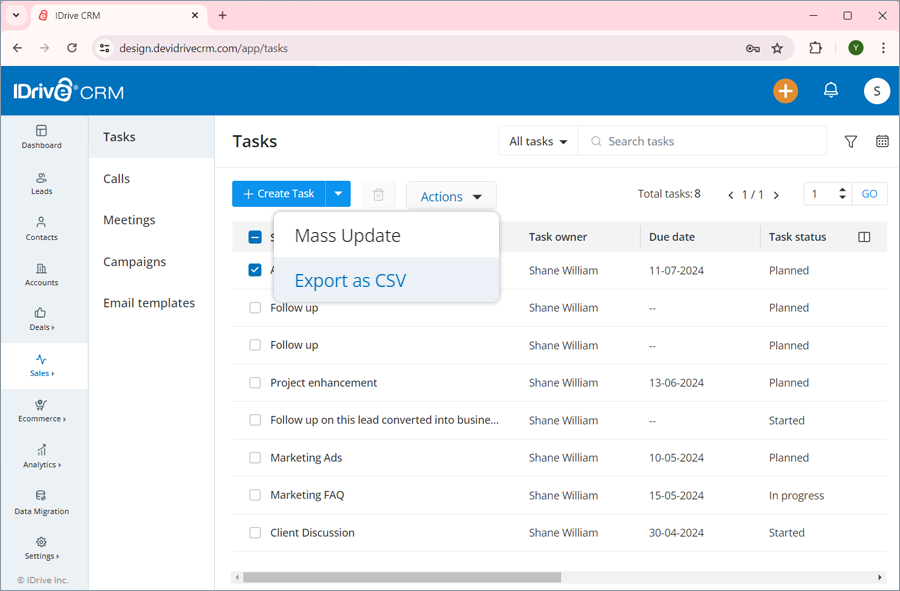
- Select Applied filters radio button to generate records with the applied filters. Alternatively, select First 5000 records to set the data range to generate records
- Click Export. The data will be downloaded on your computer in CSV format.
To view the activities associated with a task,
- Sign in to your IDrive® CRM account.
- Navigate to Sales. The Tasks page will open.
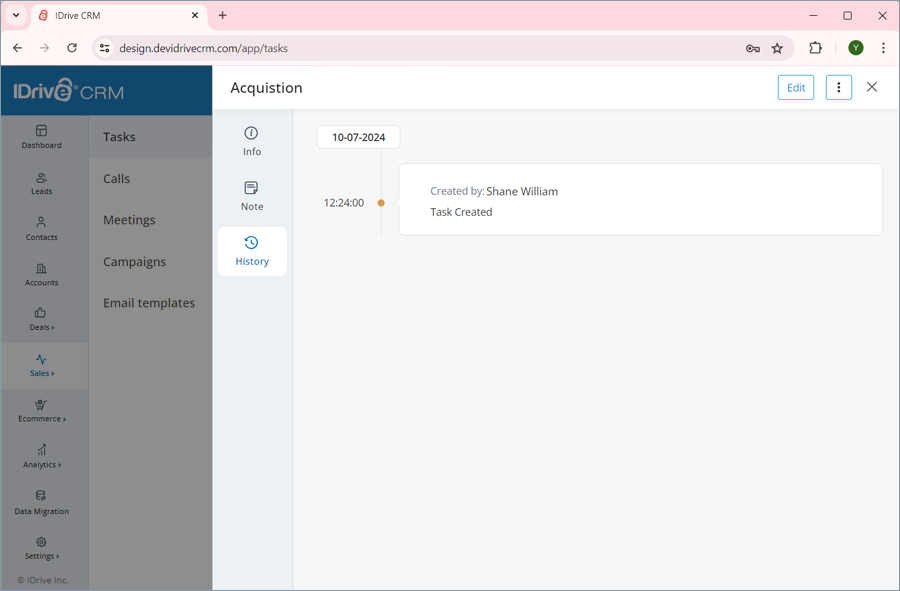
- Click anywhere on the task for which you want to view history. The view pane will appear.
- Click History. A list of all the activities associated with the task will be displayed.
To log a call,
- Sign in to your IDrive® CRM account.
- Navigate to Sales and click Calls.
- Click Log Call.
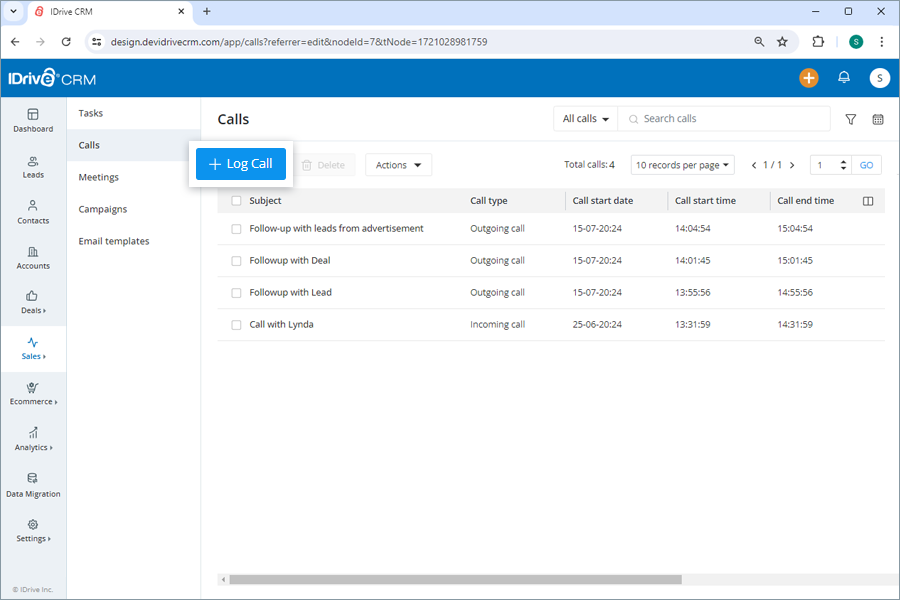
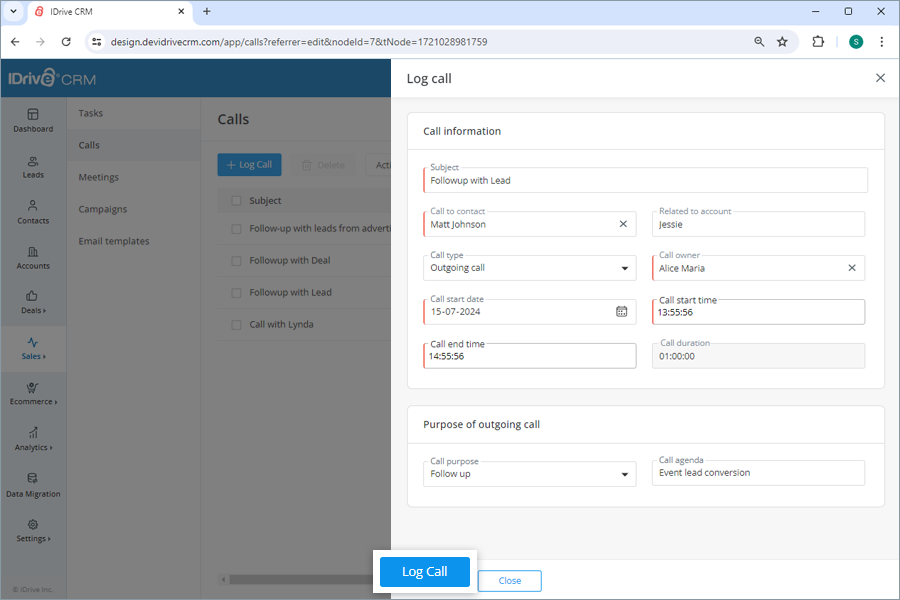
- Enter the subject and contact name.
- The call owner will be defined by default. To change the default call owner, click
 and choose a user from the dropdown list or create a new user.
 - Specify a call start date, start time, and end time. The call duration will be auto-calculated.
- Select a related account and call type from the dropdown list. Select the purpose of the call from the dropdown list and specify the call agenda.
- Click Log Call. On successful scheduling of the call, it will be listed on the Calls page.
Yes, you can edit a call.
To edit a call,
- Sign in to your IDrive® CRM account.
- Navigate to Sales and click Calls.
- Hover on the call you want to edit and click

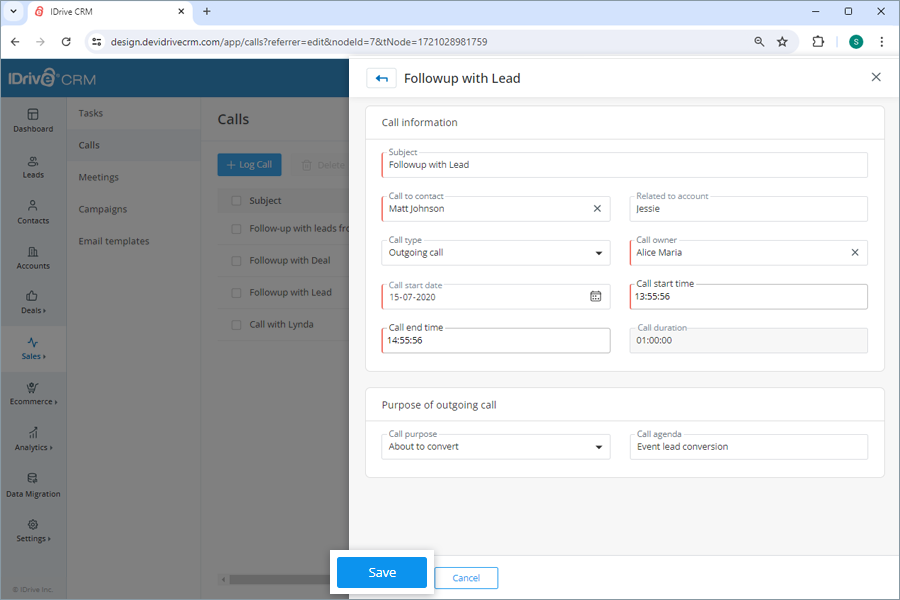
The edit call screen will appear.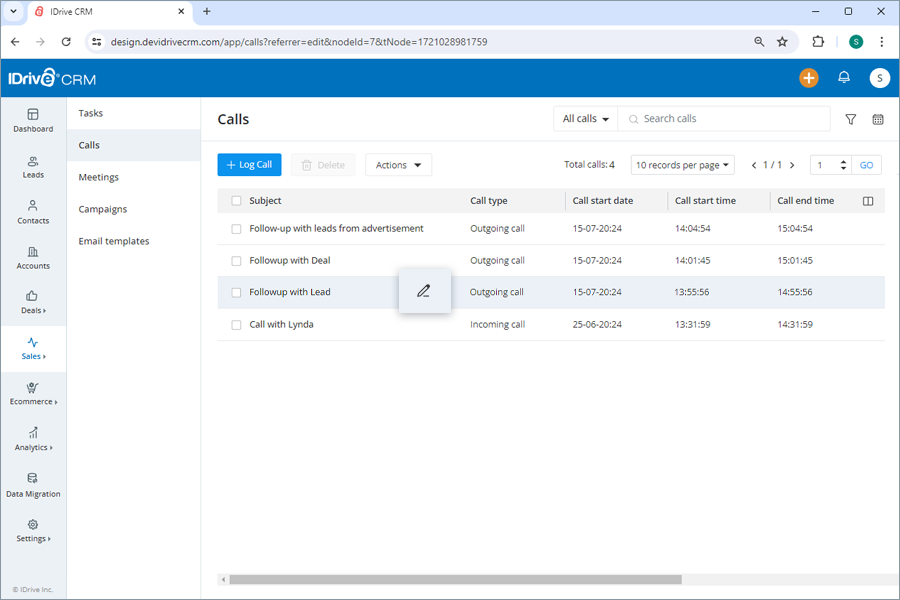
- Modify the details as required.
- Click Save to save changes.
Click
 to access the view pane. The updated call information will be displayed on the screen. You can make further changes to the call information by clicking the Edit button.
Is it possible to update specific fields in multiple records simultaneously for a call in my account?
Yes, you can mass update the values for specific fields across multiple records for a call simultaneously.
To perform mass update for a call,
- Sign in to your IDrive® CRM account.
- Navigate to Sales and click Calls.
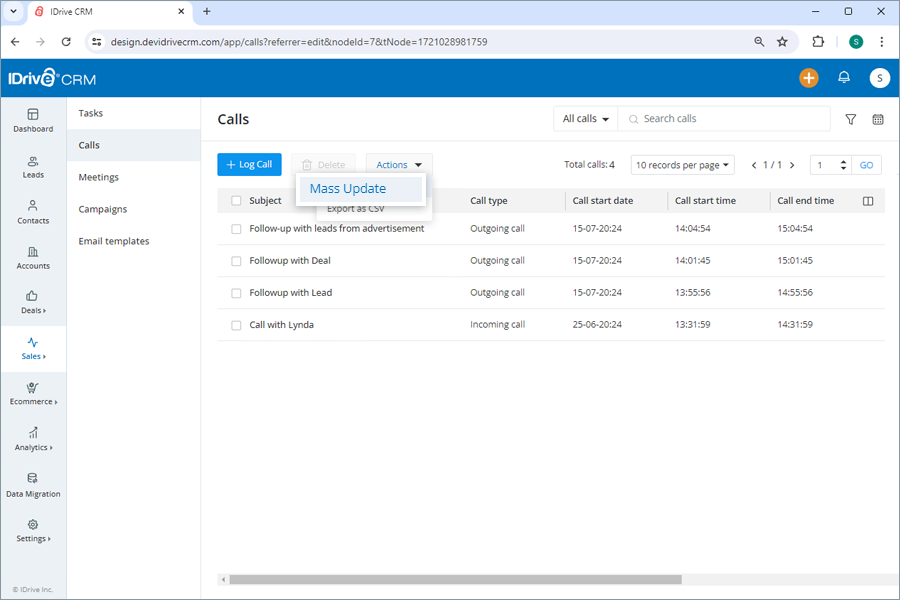
- Click Mass Update from the Actions dropdown menu.
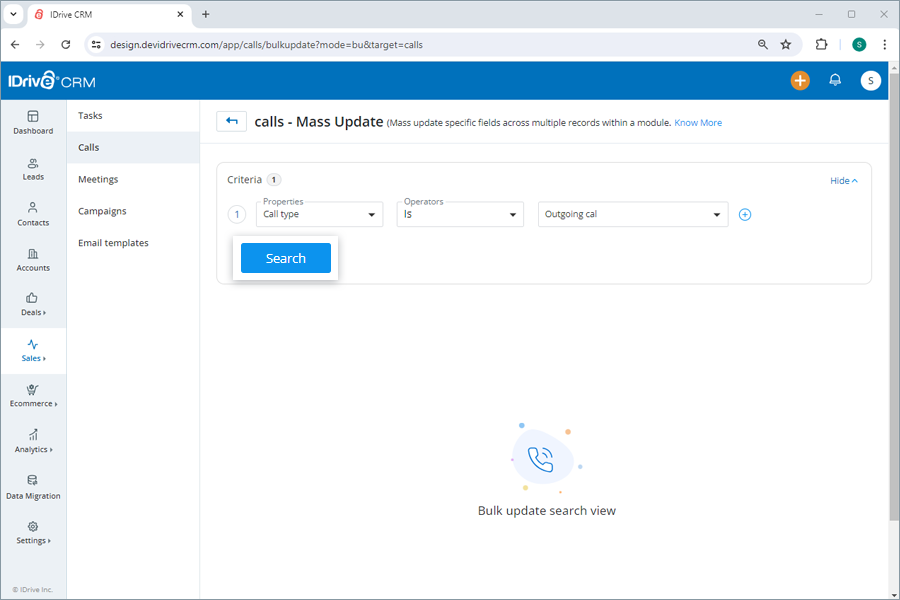
- Filter the calls as per the required criteria and click Search.
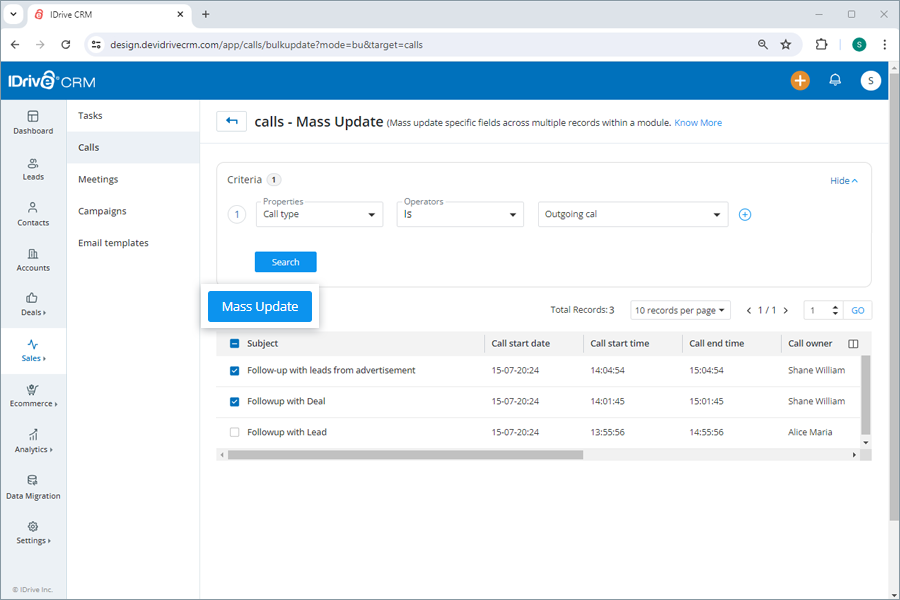
- Select the calls that you want to update and click Mass Update.
- Select the property and enter the modified values for the selected property under Update value.
- Click Update.
Similarly, you can also mass update the value of specific fields across multiple calls in your account in one go.
You can view and edit call information, clone, and delete the call by clicking the respective buttons on the view pane. You can also view the following:
- Info - View call information.
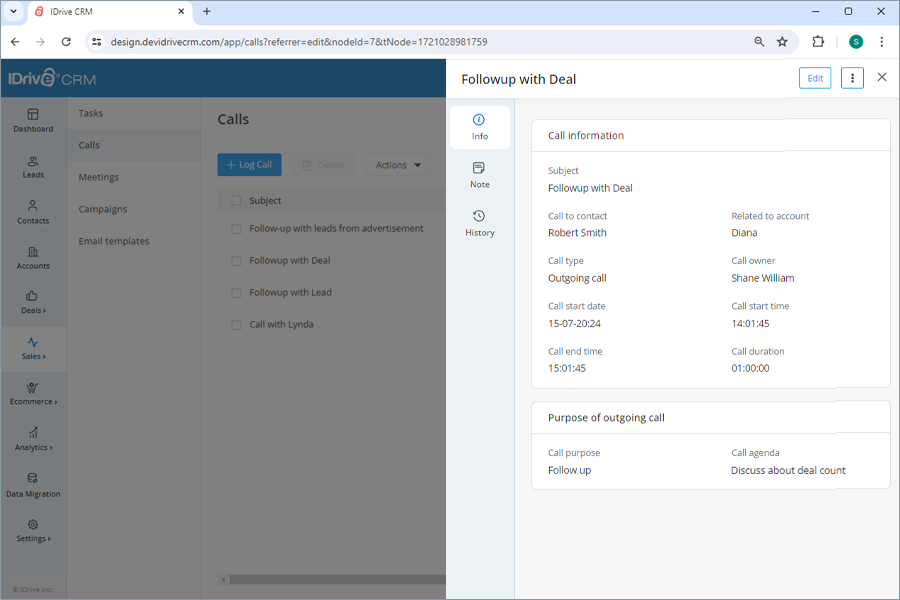
- Note - View notes or add a new note.
- History - View activity logs.
To open the view pane for a particular call, click anywhere on the call row.
Yes, you can create a clone of a call.
To clone a call,
- Sign in to your IDrive® CRM account.
- Navigate to Sales and click Calls.
- Click anywhere on the call you want to clone. The view pane will appear.
- Click
 and select Clone from the dropdown.
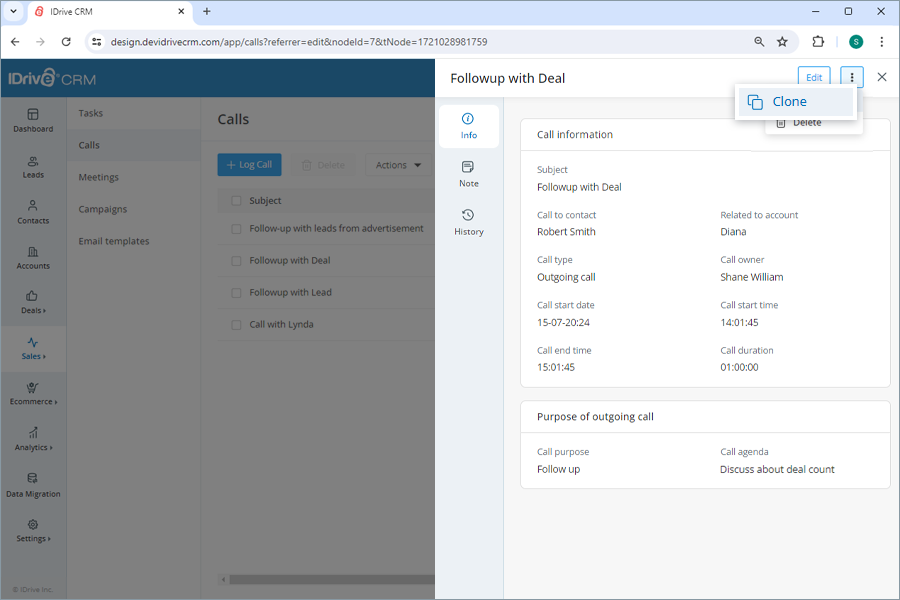
- Make changes to the call details.
- Click Clone.
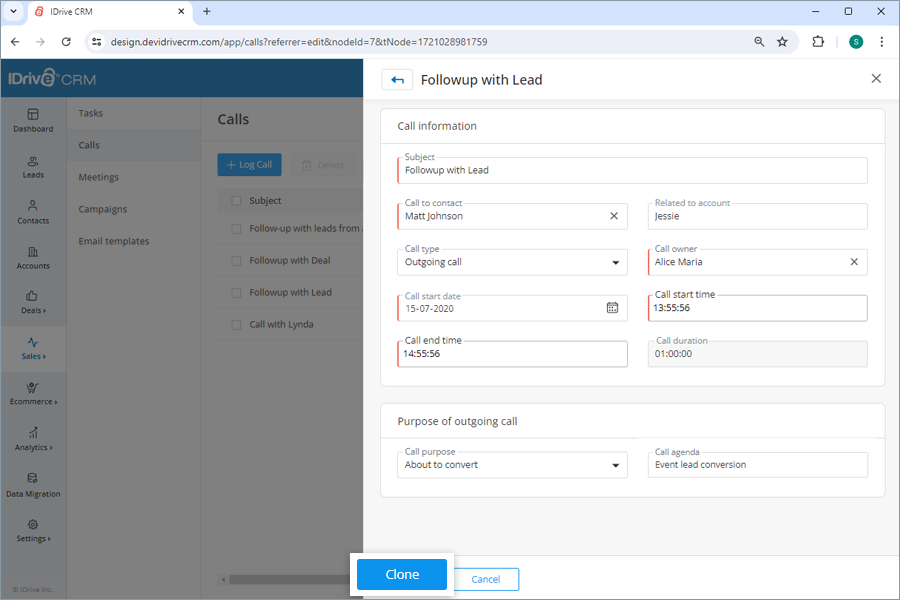
Note: You cannot create a duplicate call. You should make changes to the call details to create a clone.
To find all your calls,
- Sign in to your IDrive® CRM account.
- Navigate to Sales. and click Calls.
- Click the dropdown button.
- Select My calls from the dropdown menu.
A list of all your calls will be displayed on the screen.
Alternatively, to view the following select the respective button:
- All calls - all the calls in the account
- Incoming calls - all the incoming calls
- Missed calls - all the missed calls
- Outgoing calls - all the outgoing calls
Yes, you can search for specific calls in your account.
To search a call,
- Sign in to your IDrive® CRM account.
- Navigate to Sales and click Calls.
- Enter the call name in the Search calls field. All the calls matching the search term will be displayed on the screen.
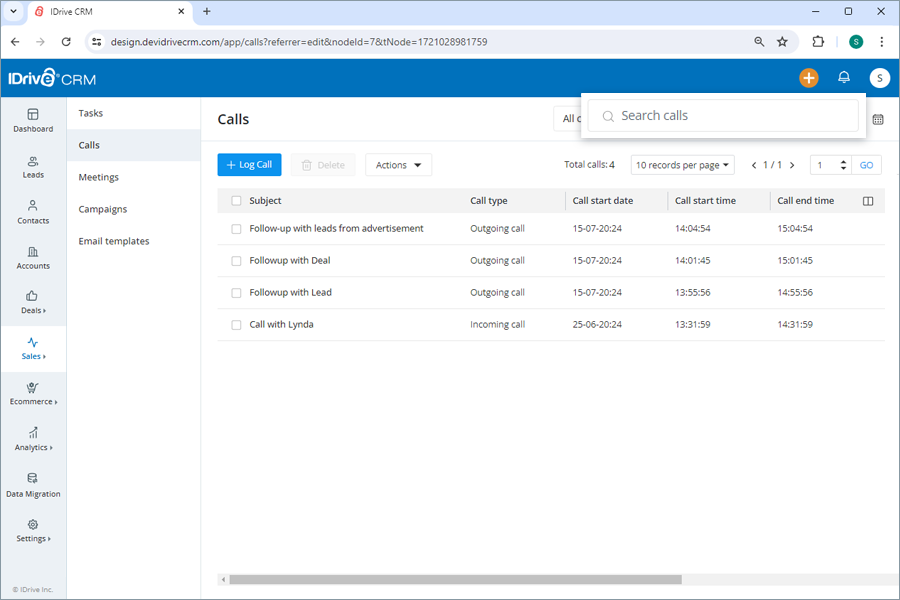
To filter calls by fields such as call type, contact name or any other column heads,
- Sign in to your IDrive® CRM account.
- Navigate to Sales and click Calls.
- Click Custom filters.
- Select the filter that you want to apply from the Filter by fields dropdown list.
- Click Apply Filter.
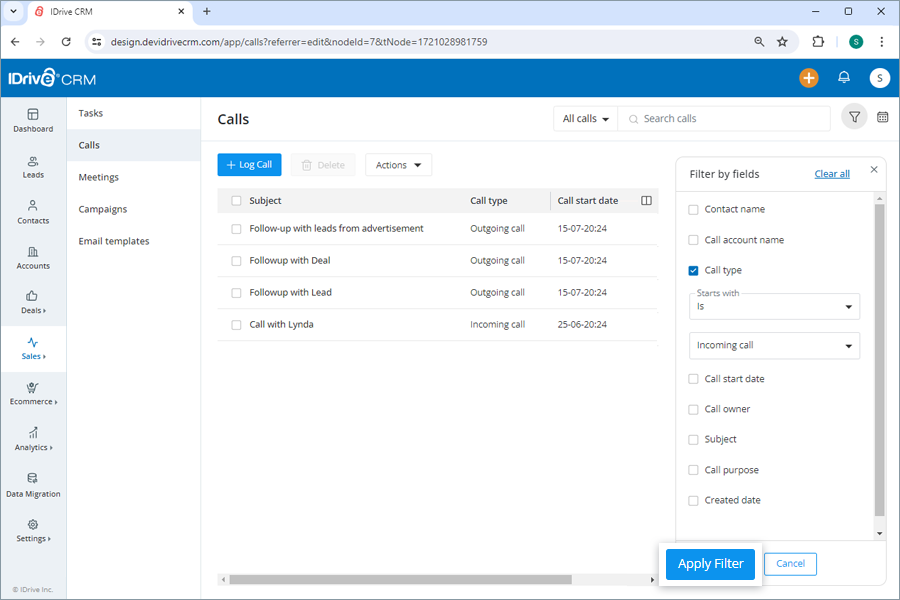
Click Clear all to remove all the selected filters.
To filter calls by time,
- Click Date filter.
- Select the filter that you want to apply from the dropdown menu.
- If you wish to customize the time period for search, click Custom range and set a specific date and time on the calendar.
- Click Apply. A list of all the calls scheduled within that specific time period will be displayed on the screen.
You can also filter the number of records to be displayed on the page by selecting the desired option from the records per page dropdown.
You can export up to 5000 deal records from your IDrive CRM account to your computer using a CSV file. Contact support to export records of larger volumes.
To export a call detail,
- Sign in to your IDrive® CRM account.
- Navigate to Sales and click Calls.
- Select the call for which you want to export the details.
- Click Export as CSV from the Actions dropdown menu. A popup window will appear.
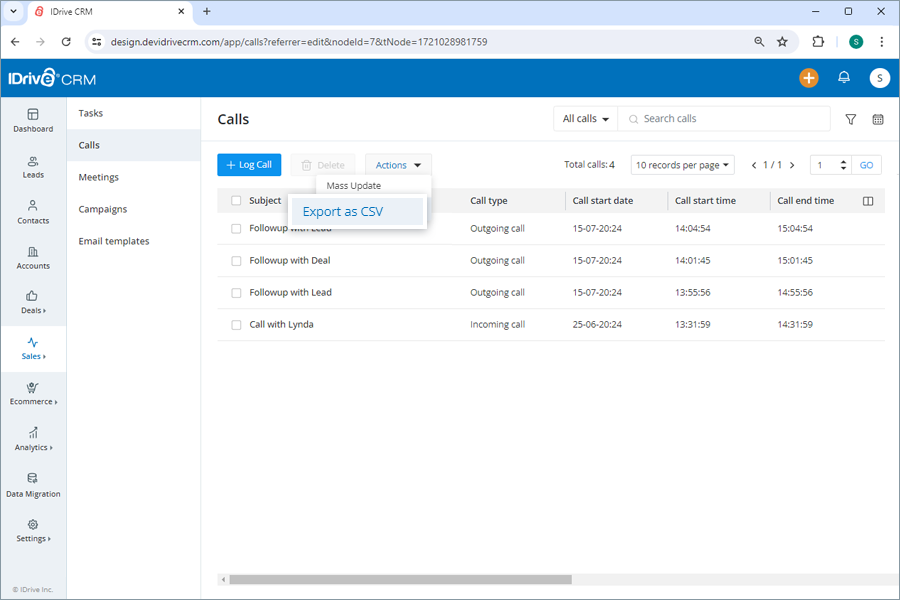
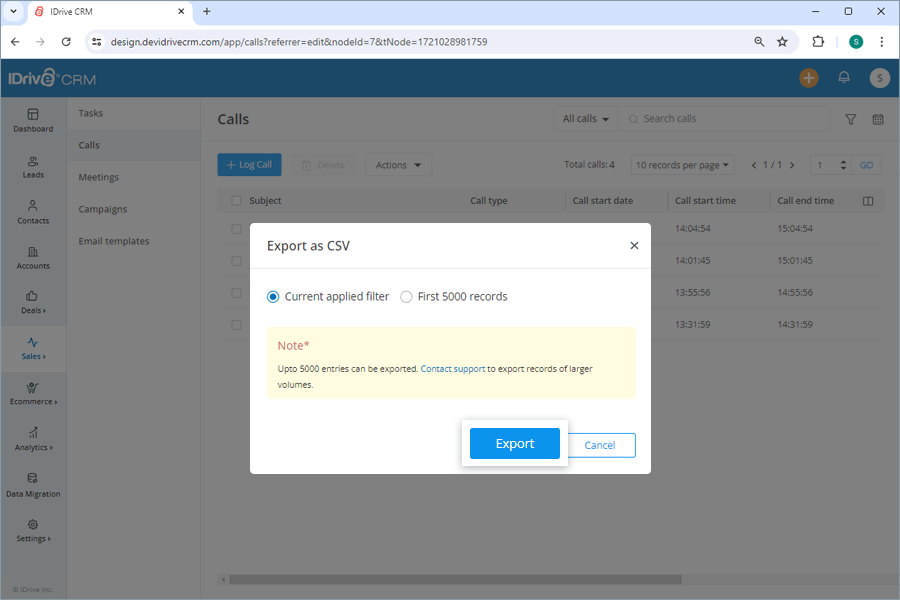
- Select Applied filters radio button to generate records with the applied filters. Alternatively, select First 5000 records to set the data range to generate records.
- Click Export. The data will be downloaded on your computer in CSV format.
To delete a call,
- Sign in to your IDrive® CRM account.
- Navigate to Sales and click Calls.
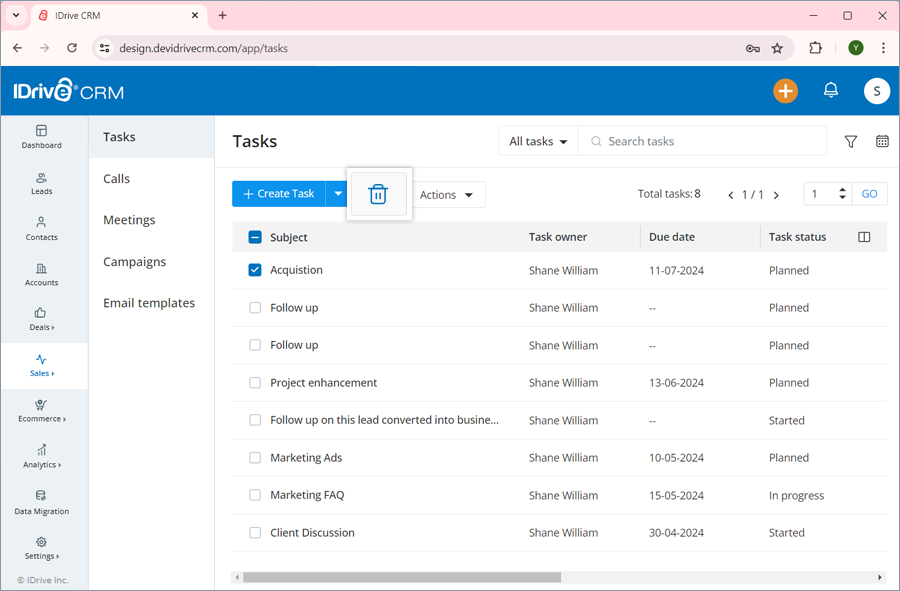
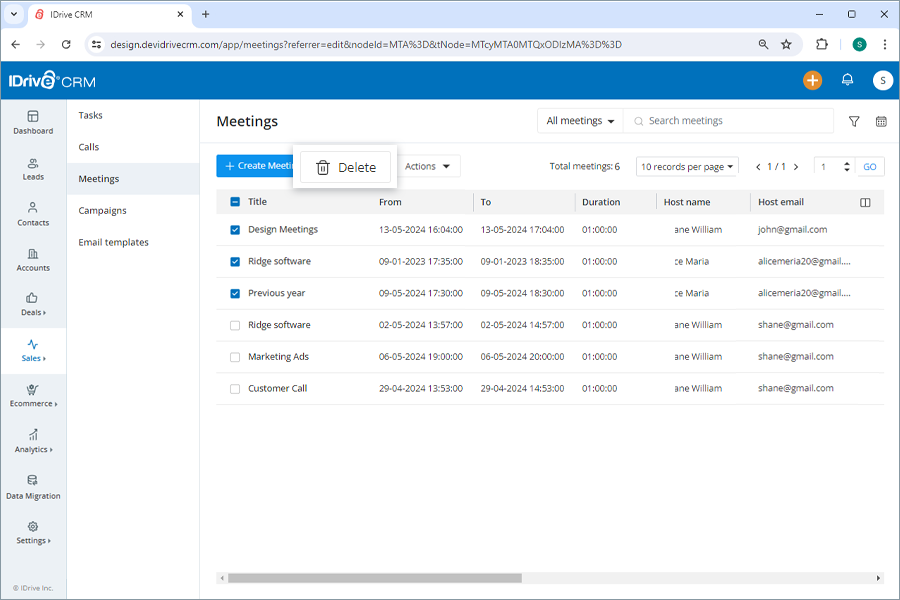
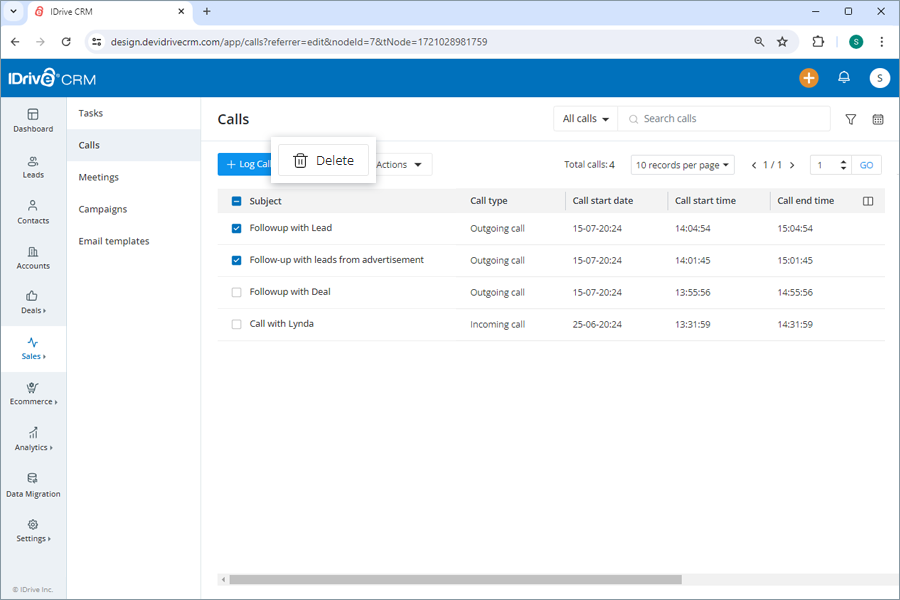
- Select the call that you want to delete.
- Click
 .
.
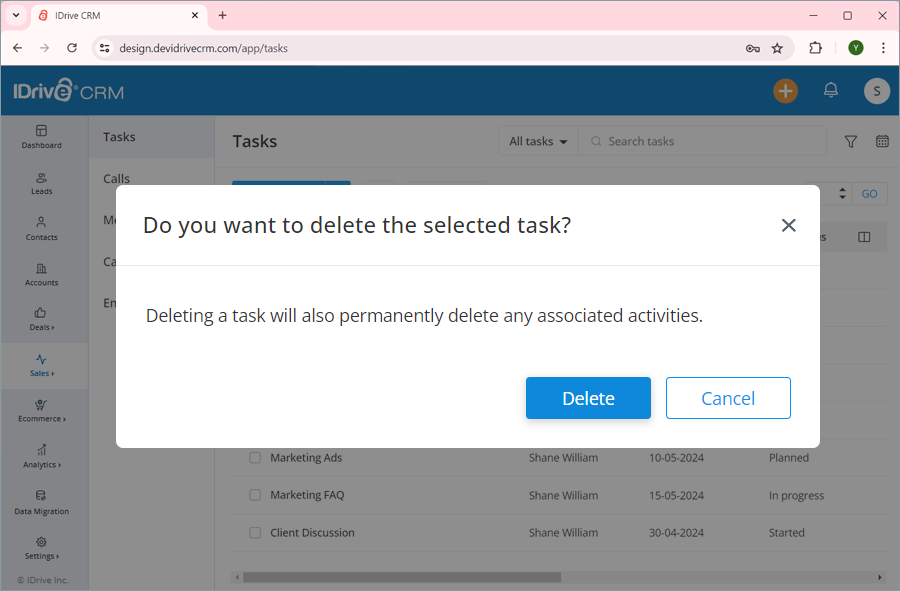
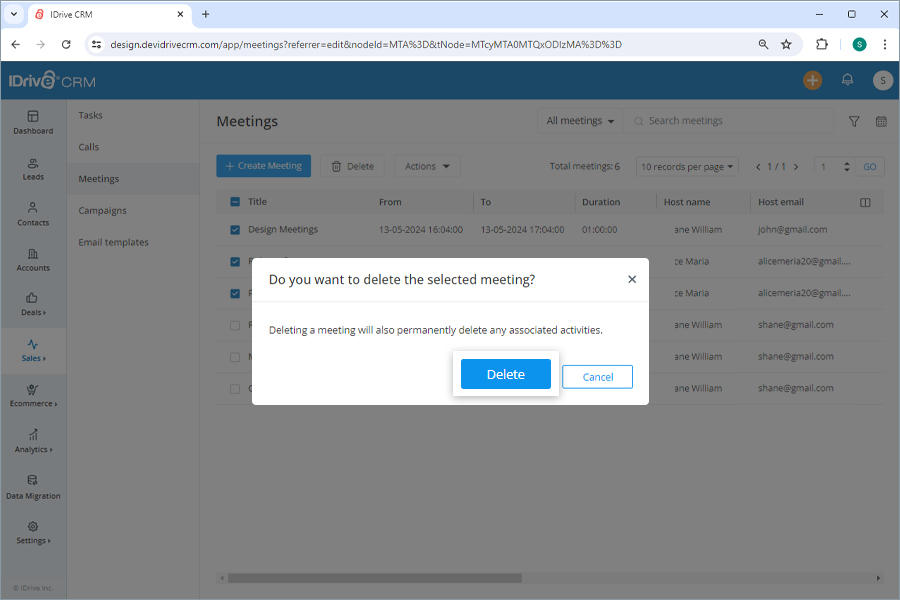
- Click Delete in the confirmation popup.
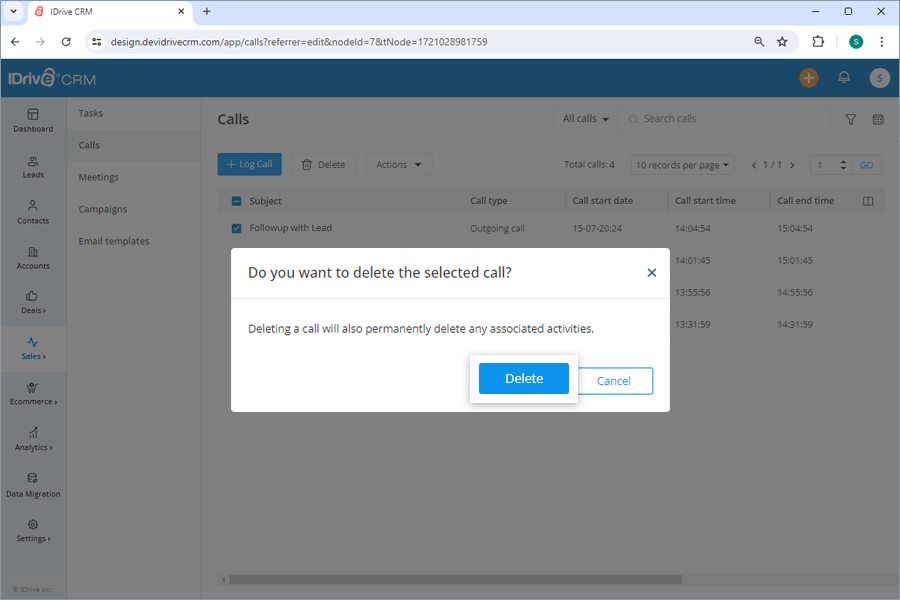
Note: Deleting a call will also permanently delete the associated activities.
- Click Delete in the confirmation popup.
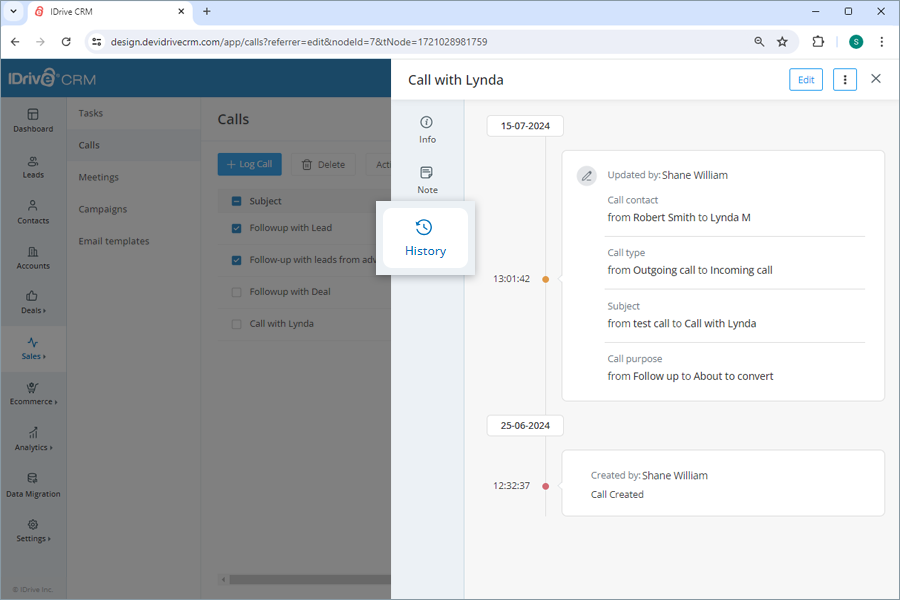
To view the activities associated with a call,
- Sign in to your IDrive® CRM account.
- Navigate to Sales and click Calls.
- Click anywhere on the call for which you want to view history. The view pane will appear.
- Click History. A list of all the activities associated with the call will be displayed.
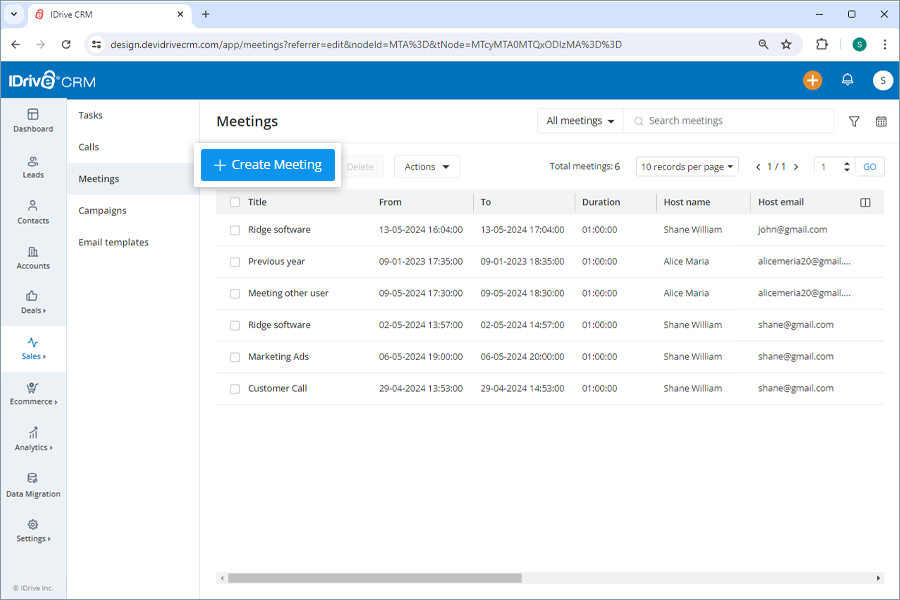
To create a meeting,
- Sign in to your IDrive® CRM account.
- Navigate to Sales and click Meetings.
- Click Create Meeting.
- Enter the title, date, time, location, description, and additional notes if any.
- Select contacts or users. Select a contact/user from the dropdown list or create a new contact/user.
- The meeting host will be defined by default. To change the default host, click
 and select a user from the dropdown list or create a new user.
- Select the meeting status, lead, deal, contact, account and video call type.
- Click Save to create the meeting.
On successful scheduling of the meeting, it will be listed on the Meetings page along with its title, date, time, location, description, additional notes, contacts or users, meeting status, lead, deal, contact, account, and video call type.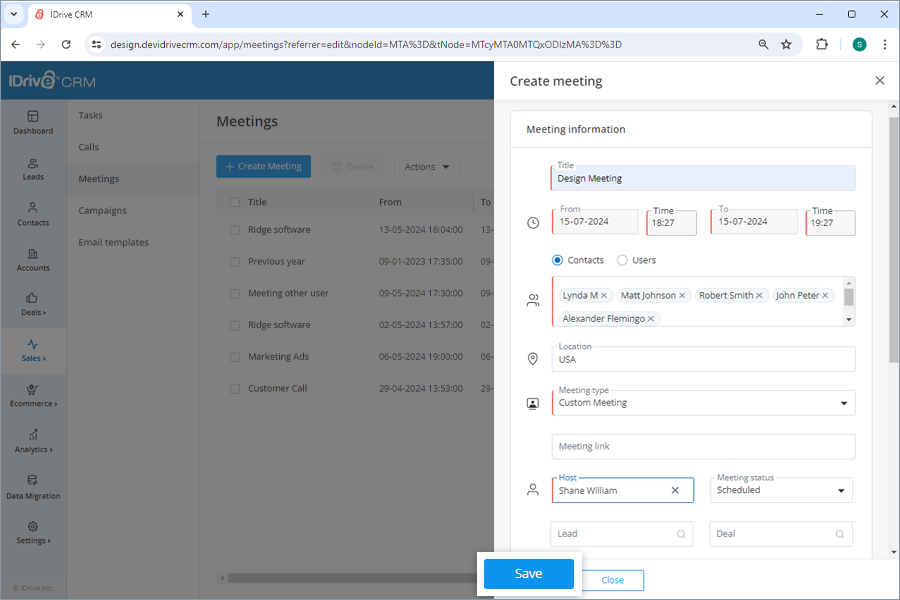
Yes, you can edit a meeting.
To edit a meeting,
- Sign in to your IDrive® CRM account.
- Navigate to Sales and click Meetings.
- Hover on the meeting you want to edit and click

The edit meeting screen will appear.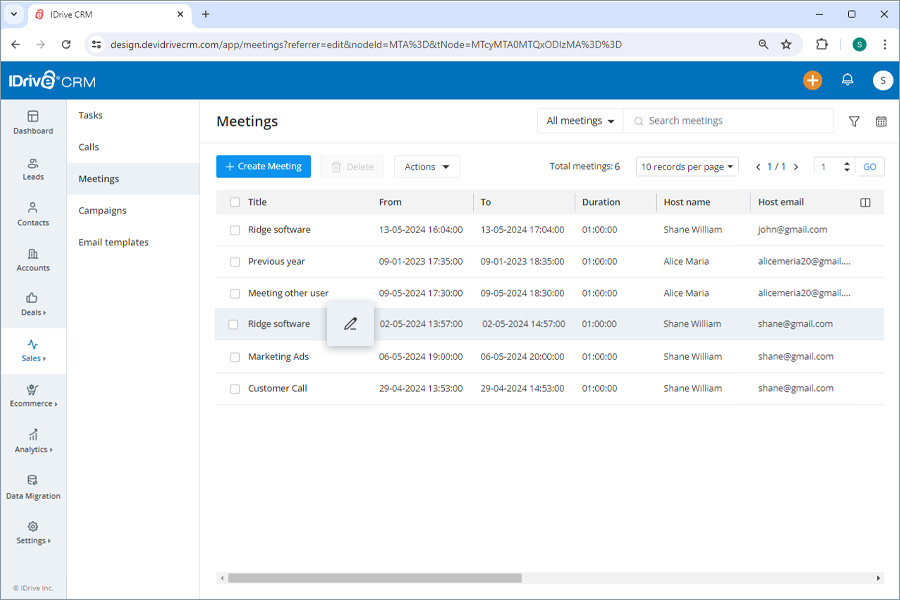
- Modify the details as required.
- Click Save to save changes.
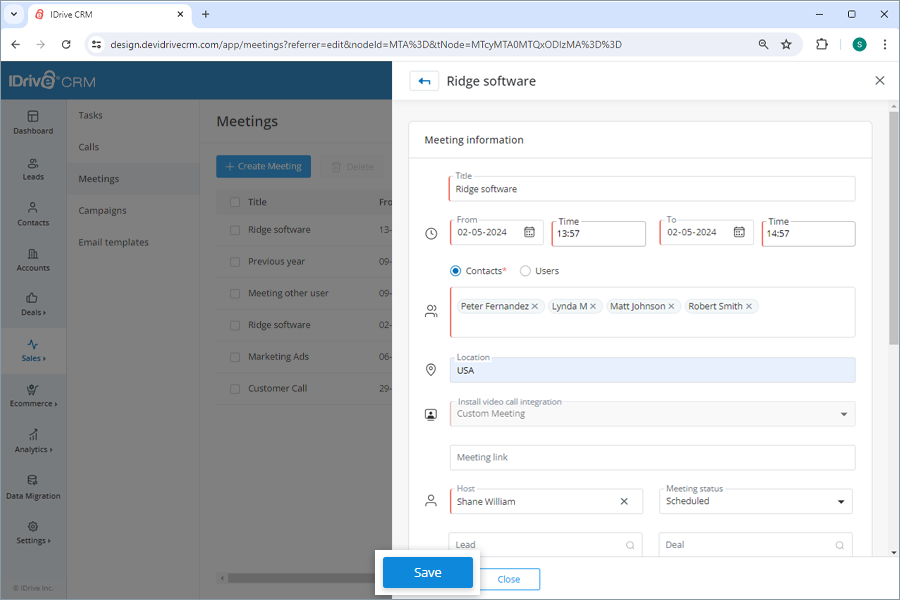
Click
 to access the view pane. The updated meeting information will be displayed on the screen. You can make further changes to the meeting information by clicking the Edit button.
To find all your meetings for a specific day,
- Sign in to your IDrive® CRM account.
- Navigate to Sales and click Meetings.
- Click the dropdown button.
- Select My today's meeting from the dropdown. A list of all your meetings for the current day will be displayed on the screen.
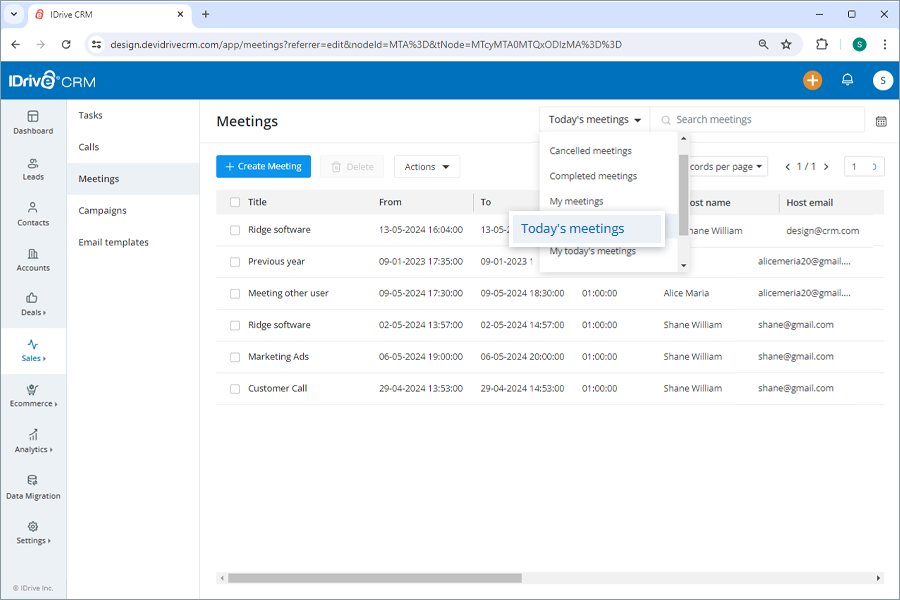
Alternatively, to view the following select the respective button:
- All meetings - all the meetings in the account
- Canceled meetings - all the canceled meetings
- Completed meetings - all the completed meetings
- My meetings - all your meetings
- Today's meetings - all the meetings for the current day
- Upcoming meetings - all the upcoming meetings
- This week's meetings - all the meetings for the current week
Yes, you can search for specific meetings in your account.
To search a meeting,
- Sign in to your IDrive® CRM account.
- Navigate to Sales and click Meetings.
- Enter the call name in the Search meetings field. All the meetings matching the search term will be displayed on the screen.
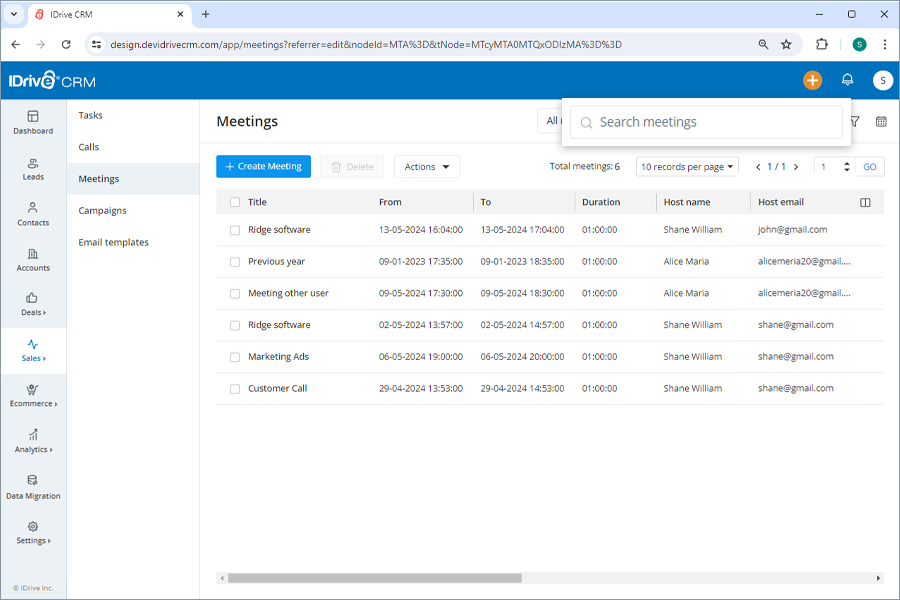
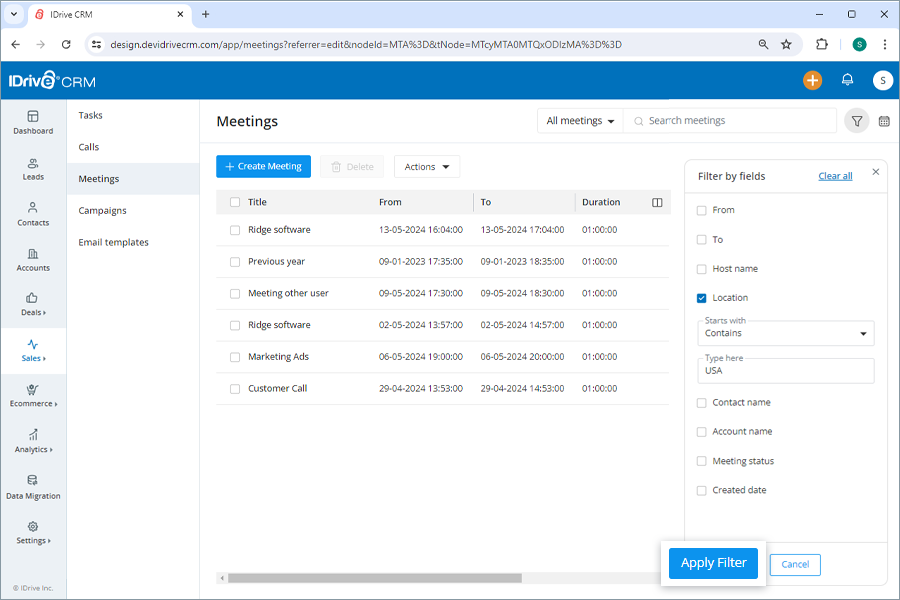
To filter calls by fields such as contact name, date, or any other column heads,
- Sign in to your IDrive® CRM account.
- Navigate to Sales and click Meetings.
- Click Custom filters.
- Select the filter that you want to apply from the Filter by fields dropdown list.
- Click Apply Filter. Click Clear all to remove all the selected filters.
To filter meetings by time,
- Click Date filter.
- Select the filter that you want to apply from the dropdown menu.
- If you wish to customize the time period for search, click Custom range and set a specific date and time on the calendar.
- Click Apply. A list of all the meetings scheduled within that specific time period will be displayed on the screen.
You can also filter the number of records to be displayed on the page by selecting the desired option from the records per page dropdown.
To export a meeting detail,
- Sign in to your IDrive® CRM account.
- Navigate to Sales and click Meetings.
- Select the meeting for which you want to export the details.
- Click Export as CSV from the Actions dropdown menu. A popup window will appear.
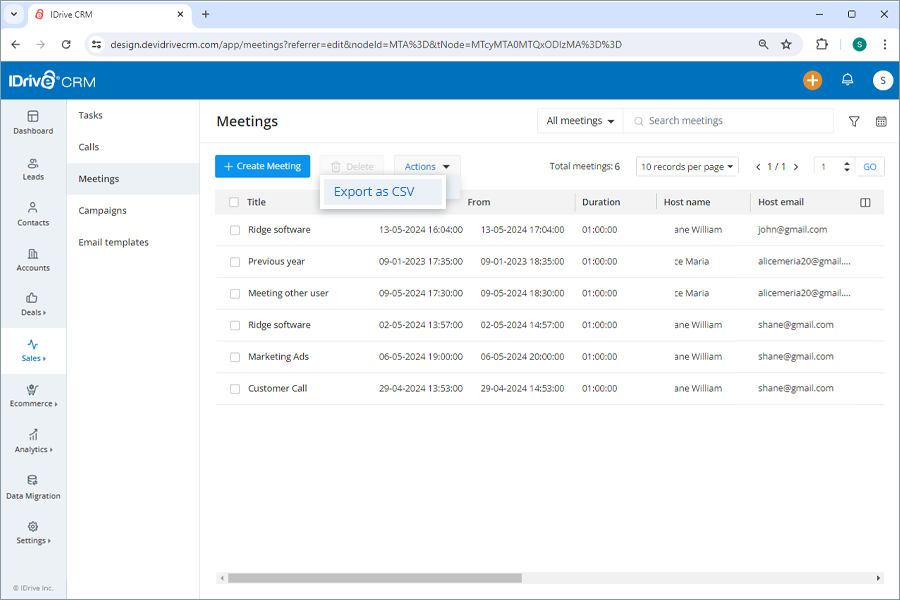
- Select Applied filters radio button to generate records with the applied filters. Alternatively, select First 5000 records to set the data range to generate records.
- Click Export. The data will be downloaded on your computer in CSV format.
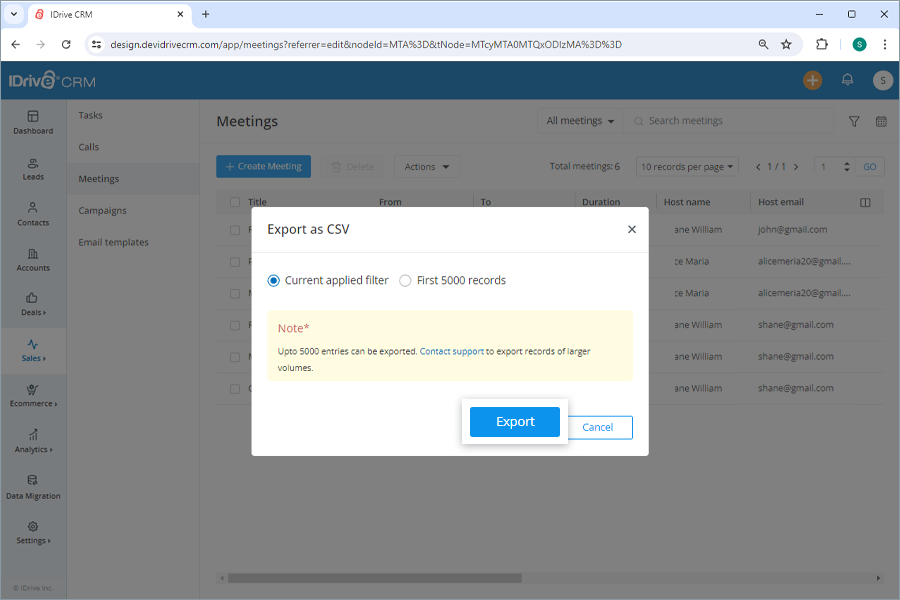
The data will be downloaded on your computer in CSV format.
To create a campaign,
- Sign in to your IDrive® CRM account.
- Navigate to Sales and click Campaigns.
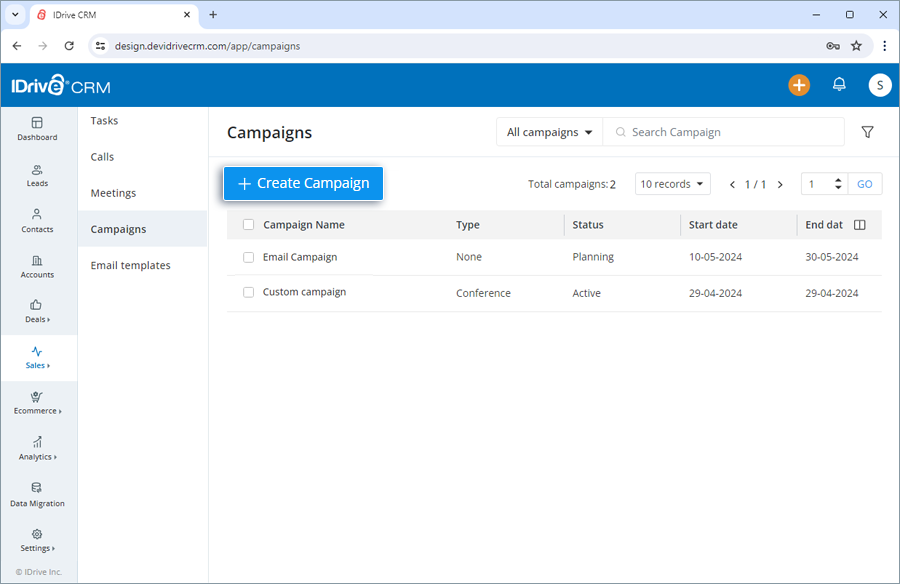
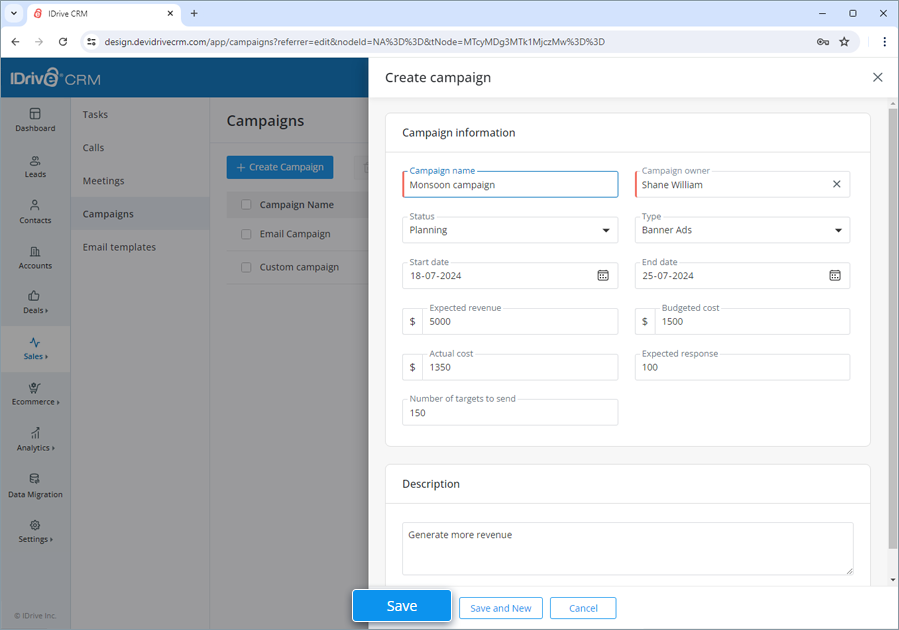
- Enter the campaign name. The campaign owner will be defined by default campaign owner, click
 and choose a user from the dropdown list or create a new user.
 - Set the status and select the type of campaign. Specify the start date and the end date for the campaign. Enter the expected revenue, budgeted cost, actual cost, expected response, and number of targets to send. Add any extra information under Description. These fields are optional.
- Click Save to create the campaign. On successful creation of the campaign, it will be listed on the Campaigns page.
Alternatively, click Save and New if you want to create the campaign and open a new create campaign form simultaneously.
Yes, you can edit a campaign.
To edit a campaign,
- Sign in to your IDrive® CRM account.
- Navigate to Sales and click Campaigns.
- Hover on the campaign that you want to edit and click
 . The edit campaign screen will appear.
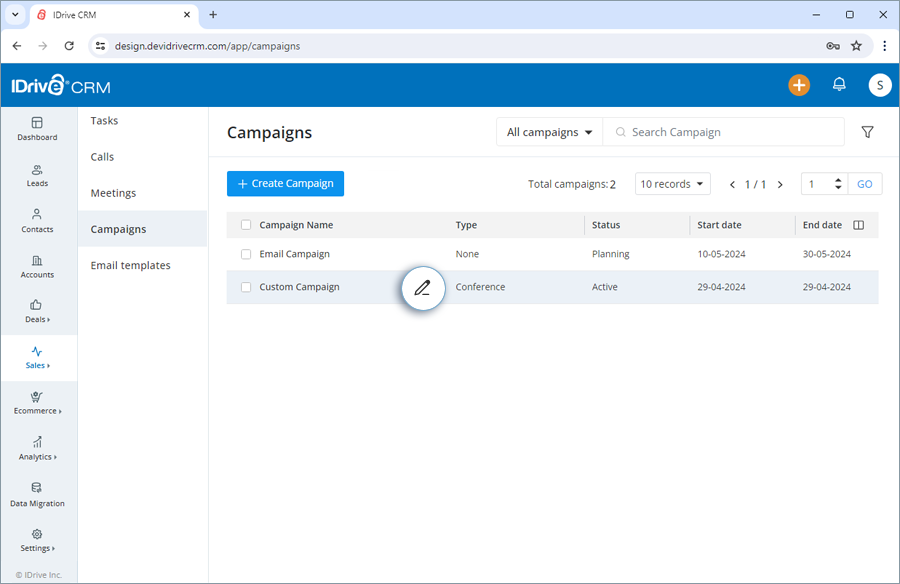
- Modify the details as required.
- Click Save to save changes.
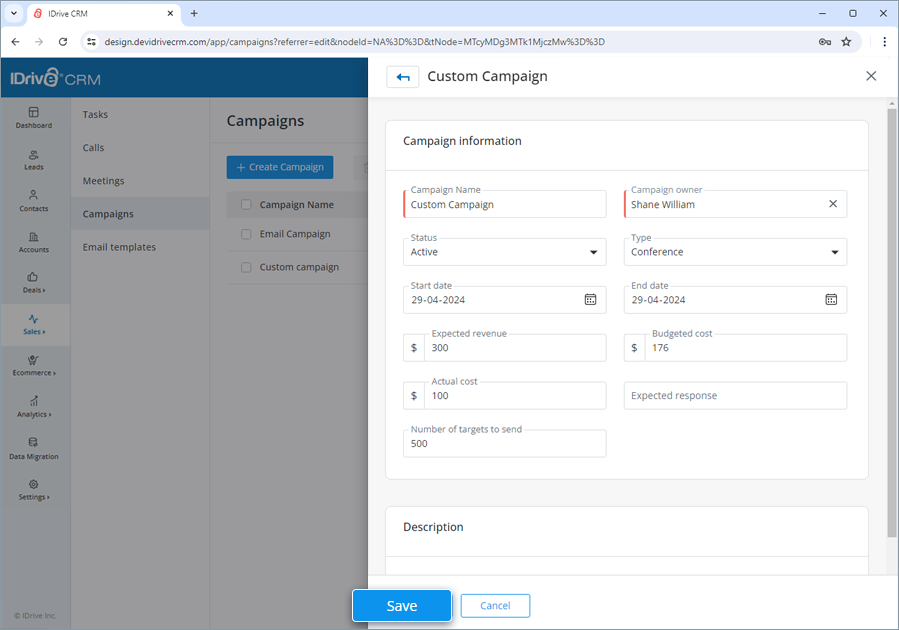
Click
 to access the view pane. The updated campaign information will be displayed on the screen. You can make further changes to the campaign information by clicking the Edit button.
You can view and edit campaign information, clone, and delete the campaign by clicking the respective buttons on the view pane. You can also view the following:
- Info - View campaign information.
- Leads - View associated leads or create a new lead.
- Deals - View associated deals or create a new deal.
- Contacts - View associated contacts or create a new contact.
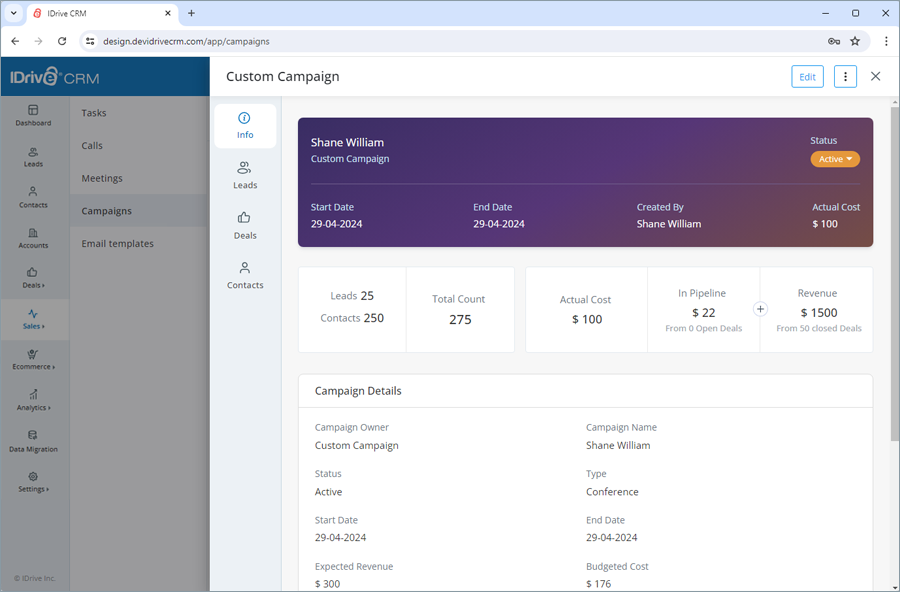
To open the view pane for a particular campaign, click anywhere on the campaign row.
To assign a lead,
- Sign in to your IDrive® CRM account.
- Navigate to Sales and click Campaigns.
- Click anywhere on the desired campaign row to which you want to assign a lead. The view pane will appear.
- Click Leads.
- Click Assign leads. A list of leads will appear.
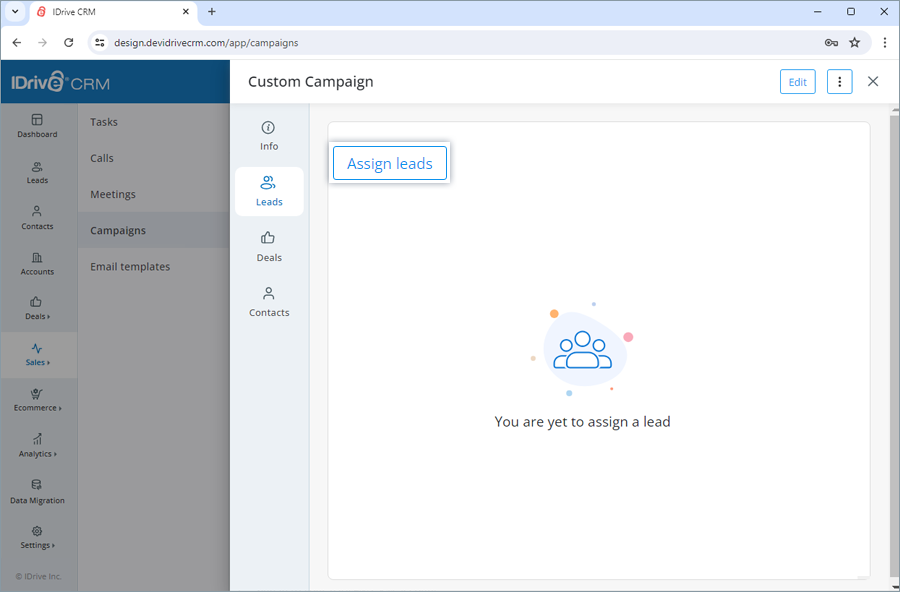
- Select the lead from the list that you want to assign to the campaign.
- Click Assign. The selected lead will be added to the campaign.
To assign a deal,
- Sign in to your IDrive® CRM account.
- Navigate to Sales and click Campaigns.
- Click anywhere on the desired campaign row to which you want to assign a deal. The view pane will appear.
- Click Deals.
- Click Assign deals. A list of deals will appear.
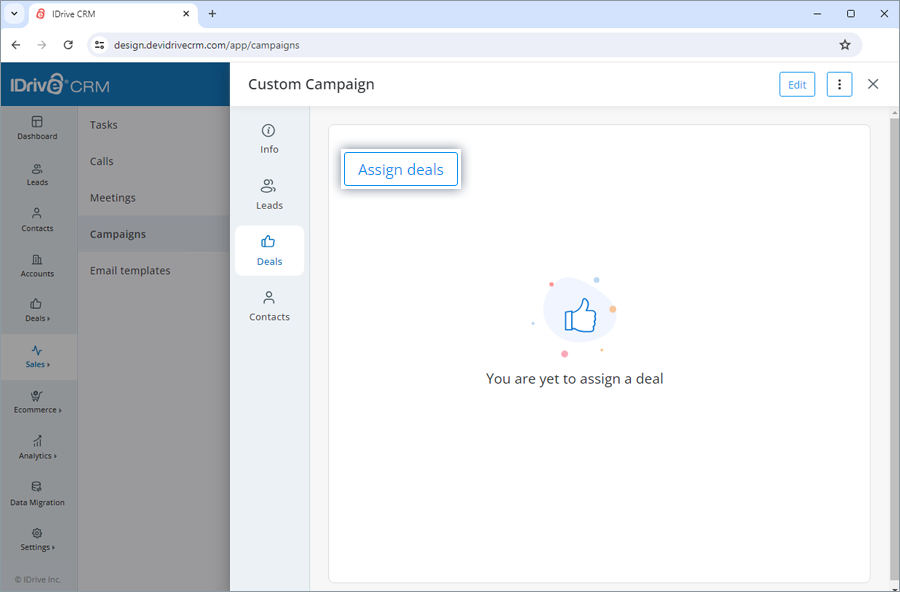
- Select the deal from the list that you want to assign to the campaign.
- Click Assign. The selected deal will be added to the campaign.
To assign a contact,
- Sign in to your IDrive® CRM account.
- Navigate to Sales and click Campaigns.
- Click anywhere on the desired campaign row to which you want to assign a contact. The view pane will appear.
- Click Contacts.
- Click Assign contacts. A list of contacts will appear.
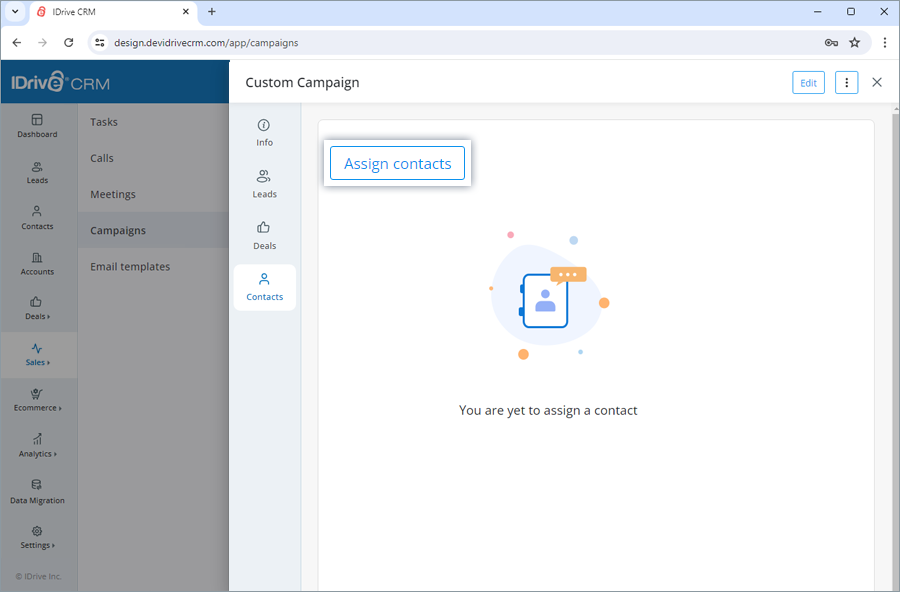
- Select the contact from the list that you want to assign to the campaign.
- Click Assign. The selected contact will be added to the campaign.
Yes, you can create a clone of a campaign.
To clone a campaign,
- Sign in to your IDrive® CRM account.
- Navigate to Sales and click Campaigns.
- Click anywhere on the campaign you want to clone. The view pane will appear.
- Click
 and select Clone from the dropdown menu.
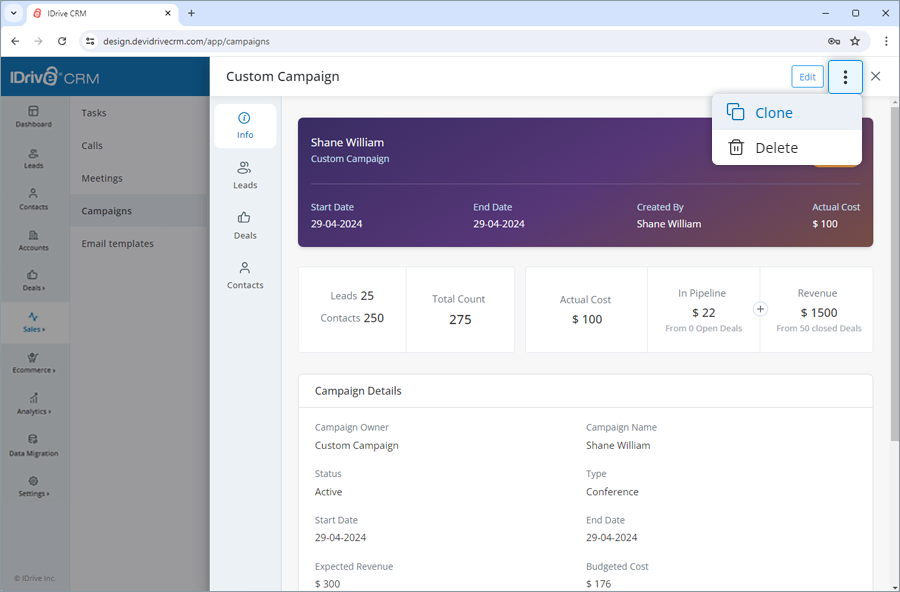
- Make changes to the campaign details.
- Click Clone.
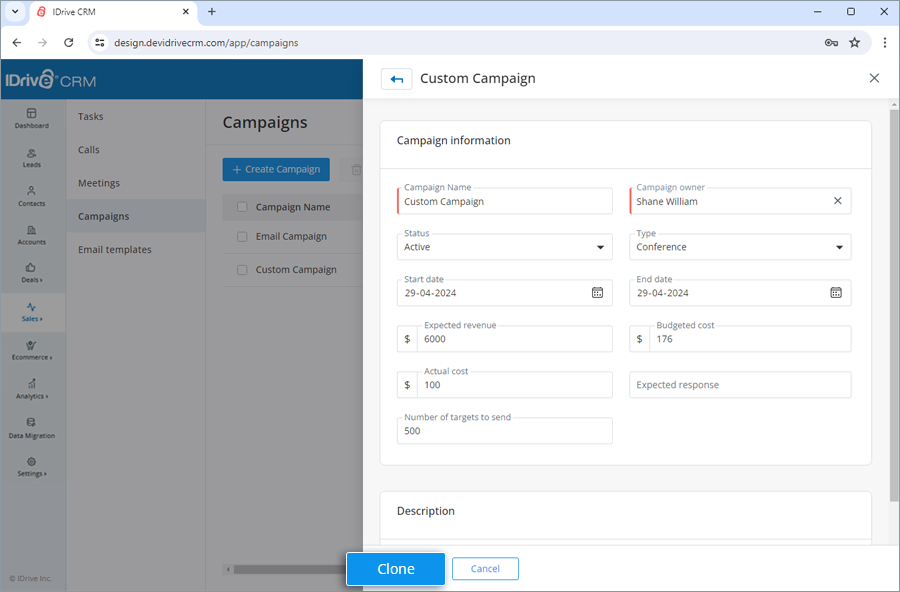
Note: You cannot create a duplicate campaign. You should make changes to the campaign details to create a clone.
To find all your active campaigns,
- Sign in to your IDrive® CRM account.
- Navigate to Sales and click Campaigns.
- Click the dropdown button.
- Select My active campaigns from the dropdown. A list of all your active campaigns for the current day will be displayed on the screen.
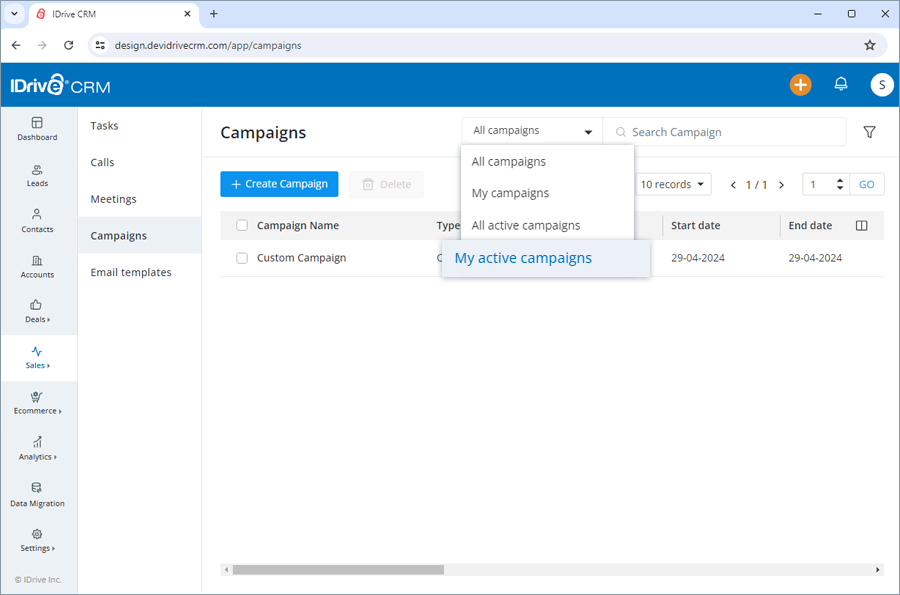
Alternatively, to view the following select the respective button:
- All campaigns - all the campaigns in the account
- My campaigns - all your campaigns
- All active campaigns - all the active campaigns in the account
Yes, you can search for specific campaigns in your account.
To search a campaign,
- Sign in to your IDrive® CRM account.
- Navigate to Sales and click Campaigns.
- Enter the campaign name in the Search campaign field. All the campaigns matching the search term will be displayed on the screen.
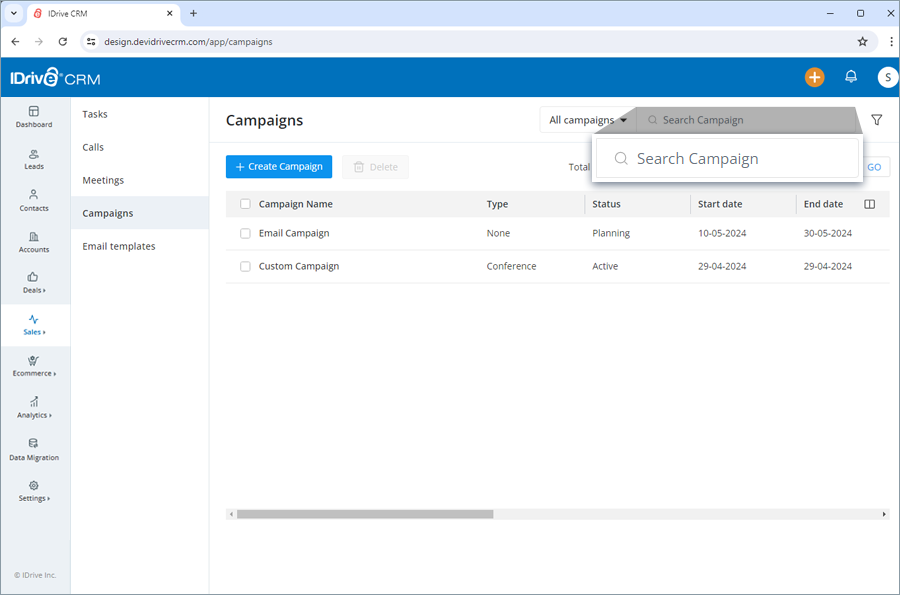
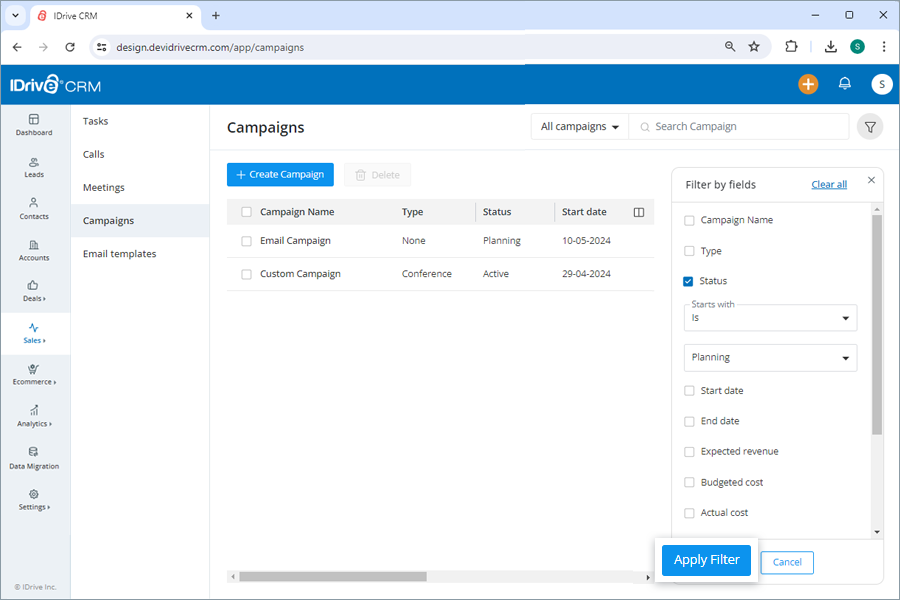
To filter campaigns by fields such as campaign owner, type or any other column heads,
- Sign in to your IDrive® CRM account.
- Navigate to Sales and click Campaigns.
- Click Custom filters.
- Select the filter that you want to apply from the Filter by fields dropdown list.
- Click Apply Filter. Click Clear all to remove all the selected filters.
You can also filter the number of records to be displayed on the page by selecting the desired option from the records per page dropdown.
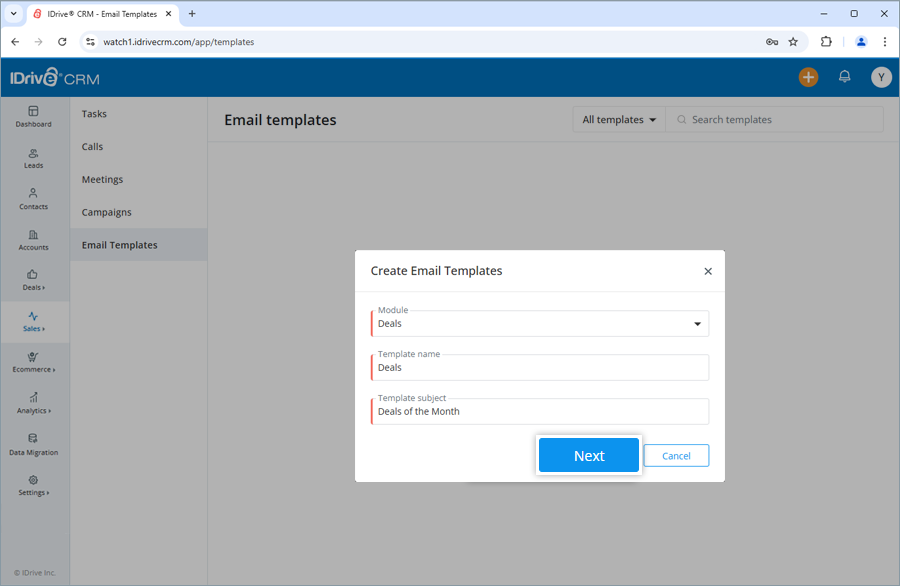
To create a new email template,
- Sign in to your IDrive® CRM account.
- Navigate to Sales and click Email Templates.
- Click Create Template.
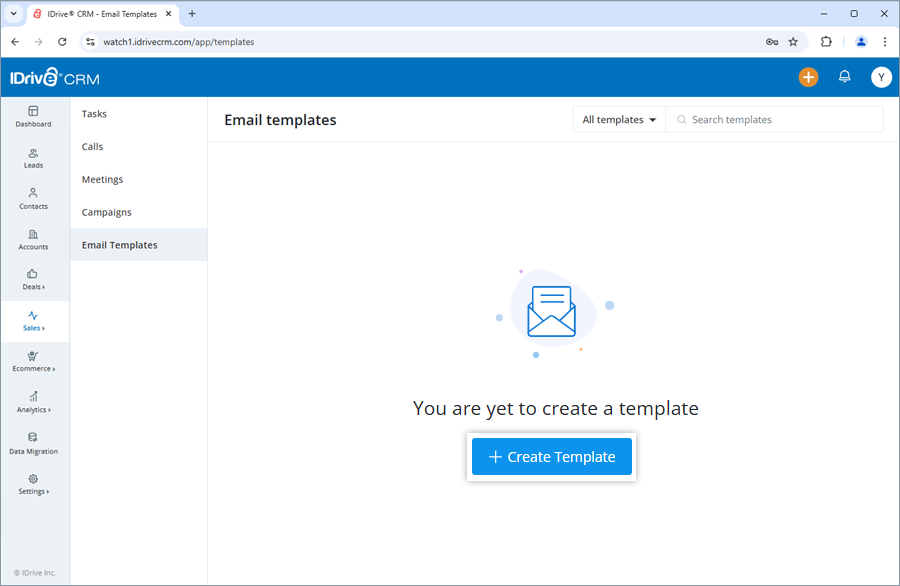
- Select a module.
- Enter the template name and template subject.
- Click Next.
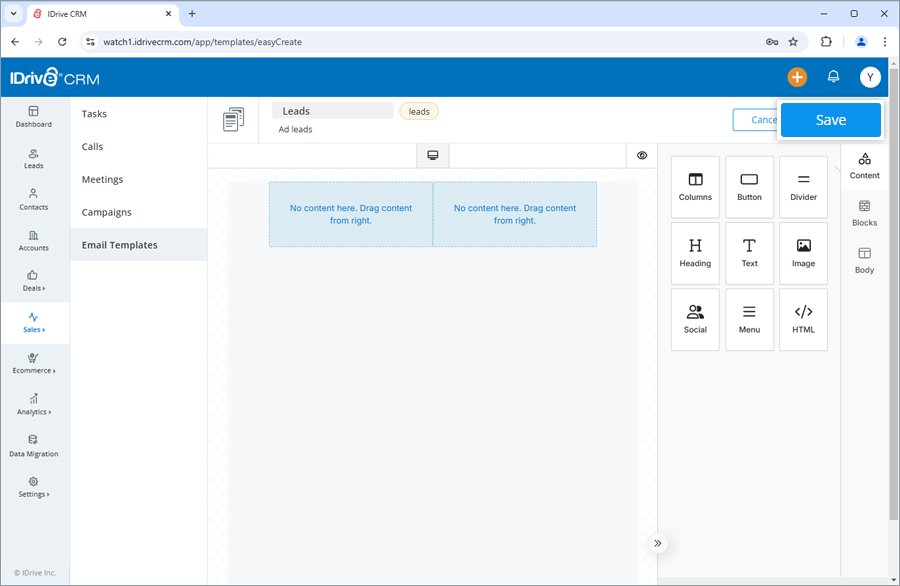
- Select any template under Basic and start by adding content, blocks, or changing the background color as per requirements.
- Customize the template as required by adding elements such as heading, image, CTA, etc.
- Click Save to create the template.
On successful creation of an email template, it will be listed on the Email Templates page.
To create email using custom templates,
- Sign in to your IDrive® CRM account.
- Navigate to Sales and click Email Templates.
- Click Create Template.
- Select a module.
- Enter the template name and template subject.
- Click Next.
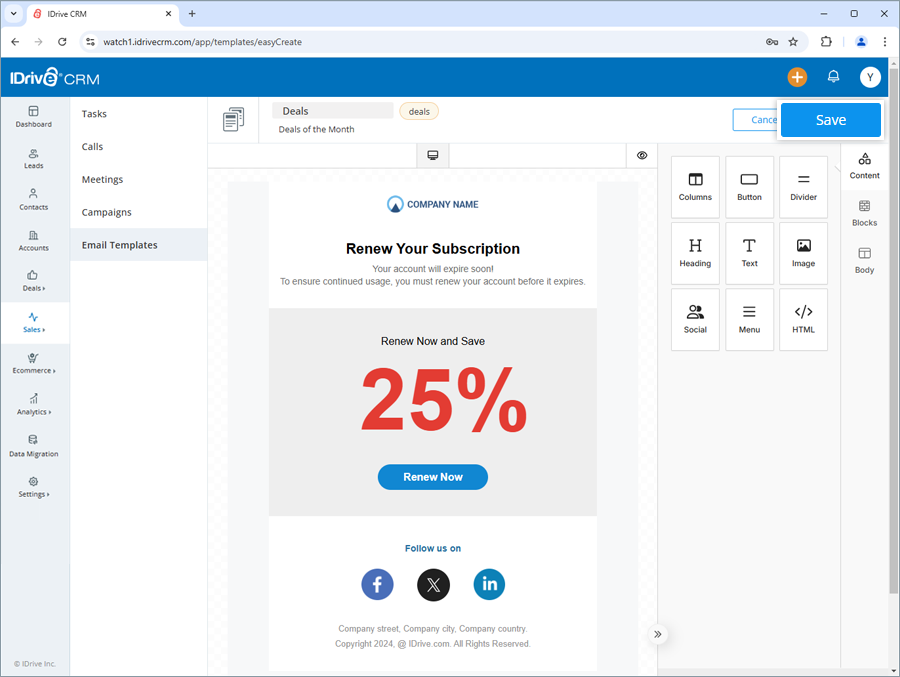
- Select a category — General, Product Promotions, Notifications, Invitations, Celebrations, Follow-ups.
- Templates with prefilled content and elements will appear.
- Drag and drop elements from the menu such as columns, buttons, image, social media links, HTML, etc.
- Click the element and delete or create a duplicate element by selecting the respective icons.
- Click Preview to check the device responsiveness and resolution.
- Click *gallery icon* if you wish to go back to the previous screen and select a different category.
- Click Save to create the template.
Yes, you can edit an email template.
To edit an email template,
- Sign in to your IDrive® CRM account.
- Navigate to Sales and click Email Templates.
- Hover on the template you want to edit and click

The edit template screen will appear.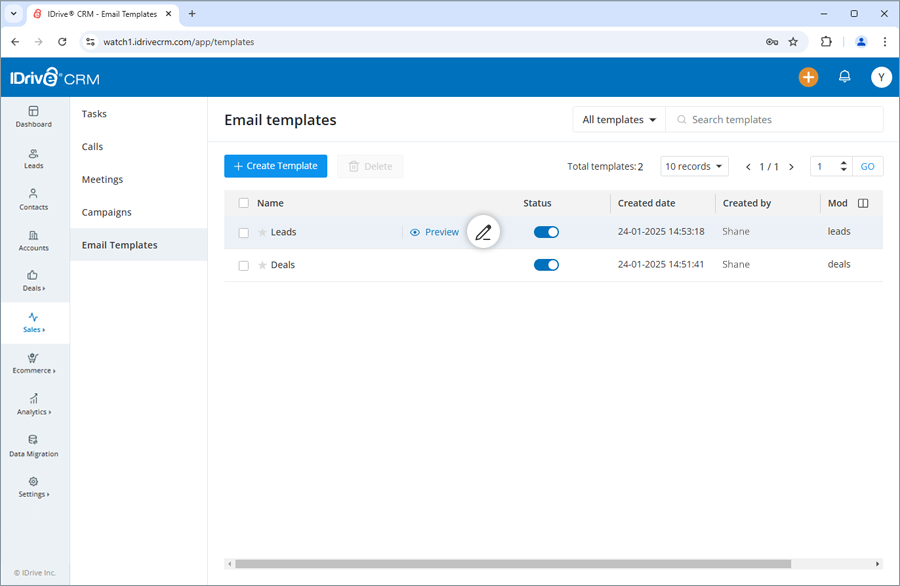
- Modify the properties as required.
- Click Save to save changes.
To find all your email templates,
- Sign in to your IDrive® CRM account.
- Navigate to Sales and click Email Templates.
- Click the dropdown button.
- Select My templates from the dropdown. A list of all your email templates will be displayed on the screen.
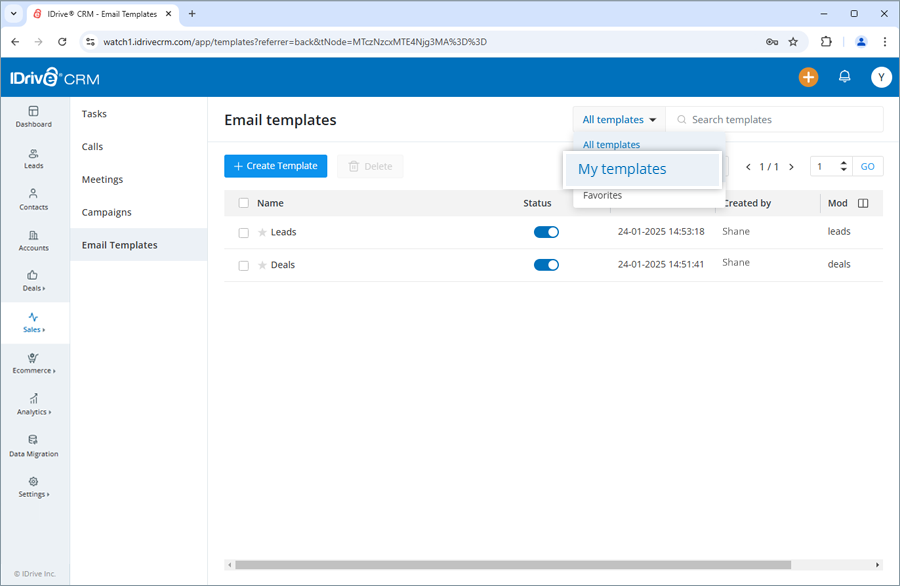
Alternatively, to view the following select the respective button:
- All templates - all the custom templates available in the account
- Favorites - all email templates marked as 'favorite' in the account
Yes, you can search for specific email templates in your account.
To search an email template,
- Sign in to your IDrive® CRM account.
- Navigate to Sales and click Email Templates.
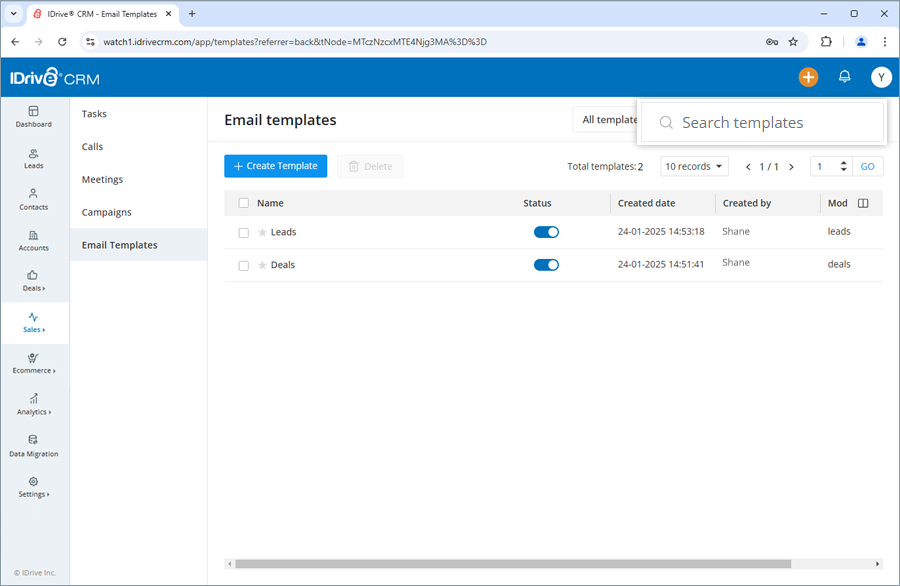
- Enter the call name in the Search templates field. All the email templates matching the search term will be displayed on the screen.
To delete an email template,
- Sign in to your IDrive® CRM account.
- Navigate to Sales and click Email Templates.
- Hover on the template you want to delete and click

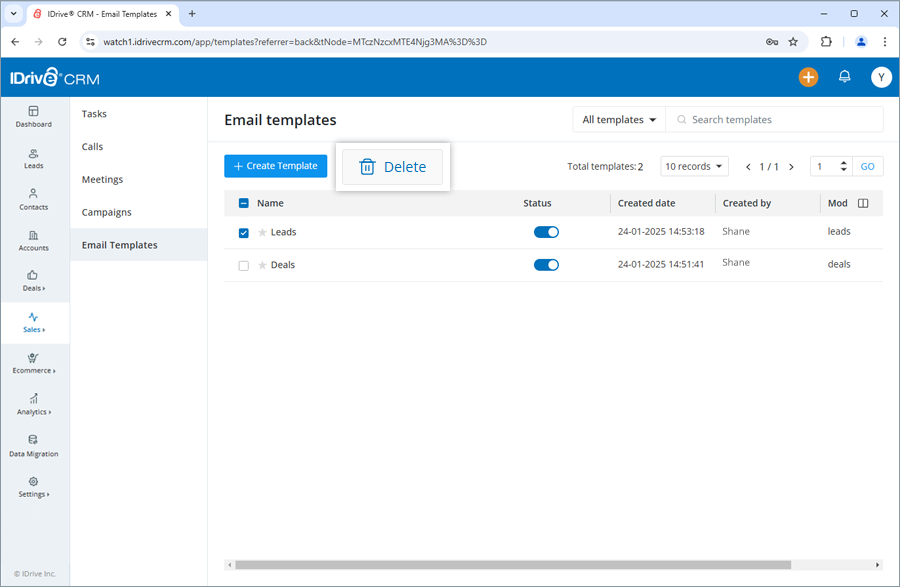
- Click Delete in the confirmation popup.
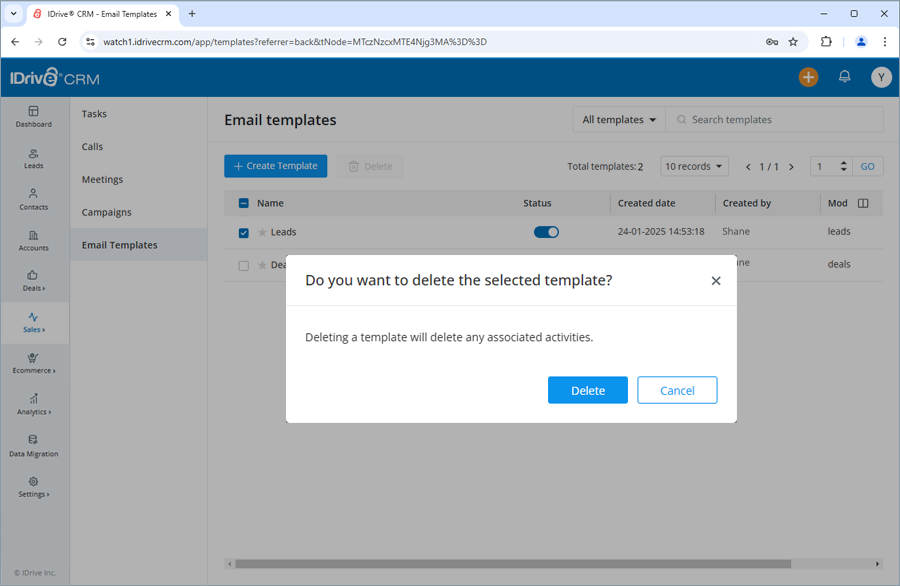
Note: Deleting a template will also permanently delete the associated activities.
- Filter the calls as per the required criteria and click Search.

